Saturday, July 31, 2010

Gurls Night Out


This tutorial was written in PSP 9 and can be used with any other version.

I assume that you have a working knowledge of PSP.


-----------------------

Supplies Needed:

Tube of choice/close up

Scrap by Sweetness Expressions

Buy this awesome scrap HERE

Collab Temp by Cakes&Vixen

Get their “Vixen” Template Here

Font of choice, I don’t remember

what mask I used sorry.


Plugins Optional:

Penta.com - color dot

Photo Effex - scanlines


-----------------------

I am using the artwork of Elias Chatzoudis

You buy his tubes here www.mypsptubes.com

-----------------------


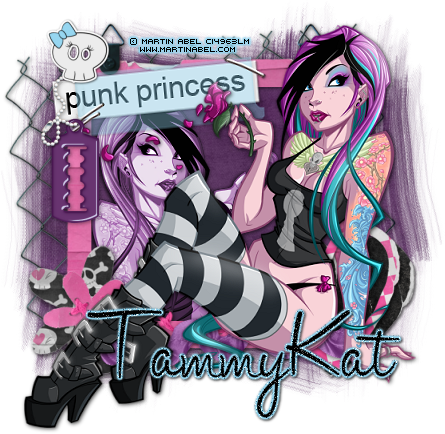
Alright let’s open your template, I removed the wordart there is several blank layers for some reason just go through and delete them first, let’s open your scrap pieces of choice, I resized the template down a few, now let’s start, select “vector2” selections all float> defloat copy and paste paper of choice invert>delete select none, do the same thing with “vecter4” layer, selections all float>defloat copy and paste your paper of choice invert>delete select none, Close out of every layer then merge these 2 new paper layers add drop shadow.


Now let’s select “raster 14” & “raster13” layers one at a time selections all float>defloat copy and paste paper of choice to each 3 sets either the same paper for all 6 or different colors for each, invert>delete select none merge these add drop shadow. Now lets go to the two splats selections all float>defloat add a new raster layer now flood fill color of choice, select none, do the same with the other splat. Now add noise to it or just leave it blank merge these also add drop shadow.


Now let’s select the left “black box” layers one at a time selections all float> defloat copy and paste tube of choice, invert>delete select none, do the same for the other right “black box” layer, copy the same tube or different, invert>delete select none, now for the 2 black boxes I didn’t flood fill with color or paste paper, so I just turned the tubes to black and white. Then I added the scanlines plugin to each tube, now click on the middle pink box selections all float>defloat copy and paste your tube of choice invert>delete select none I messed around with the blend mode for the tube now add your color dot plugin.


Now merge all of the boxes add a drop shadow to these, now last part lets select “lines” rasters selections all float>defloat copy and paste paper of choice invert>delete select none, now do the same for “raster5", Now it’s time for your main tubes I used 2 place them where you want them resize them first if needed add drop shadows, Open all your scrap elements of choice resize them, I used admit one tickets, gurls night out wordart, purple flower, beaded wire, purple lips, place them where you want them add drop shadows to all of your elements, now add your mask, resize your tag if you want, add your copyrights your name save as a PNG and you’re done.


Thanks for trying my tutorial.

Now lets see those results,

I hope you have enjoyed this tutorial!


-----------------------

This tutorial was written on July 31th, 2010 by Melissa.

In no way may this tutorial be copied to another

website without the creators permission. Any resemblance

to this tutorial is purely coincidental.

Punk Princess


-->


This tutorial was written in PSP 9 and can be used with any other version.
I assume that you have a working knowledge of PSP.

-----------------------
Supplies Needed:
Tube of choice/close up
Hot Scrap by TammyKat
Buy her scrap HERE
fonts & mask of choice
WSL_Mask117 Here

-----------------------
I am using the artwork of Martin Abel
You buy his tubes here CILM
-----------------------


Open up the frame with the barbwire in the background, resize about to 80% I think, just reize it down where you like it, now go to image>canvas size set at 600x600, drag your frame up higher in the middle of the frame, grab your magic wand click the inside modify> expand by 6 copy and paste paper of choice drag above frame layer, now let’s open your main tube resize it down, place in the front of your frame add drop shadow, duplicate your tube image>mirror then select your paper layer selections all float> defloat copy and paste your tube get it inside your frame where you want it invert>delete, now change your blend mode to luminance legacy.


Now let’s open your scrap elements of choice, I used the purple ribbon, keychain razor blade, one of the cute skulls, black and pink hearts, punk princess label, resize these and place them where you want them use my tag as a reference now add a drop shadow, also add one to your frame, now just add your mask, copyrights, name save as a PNG and now you’re done!


Thanks for trying my tutorial.
Now lets see those results,
I hope you have enjoyed this tutorial!


-----------------------
This tutorial was written on July 31th, 2010 by Melissa.
In no way may this tutorial be copied to another
website without the creators permission. Any resemblance
to this tutorial is purely coincidental.

Friday, July 30, 2010

Key To My Heart


-->


This tutorial was written in PSP 9 and can be used with any other version.
I assume that you have a working knowledge of PSP.


-----------------------
Supplies Needed:
Tube of choice/close up
Gorgeous Scrap by Chassity
Buy her scrap Here
fonts & mask of choice
WSL_Mask128 Here


-----------------------
I am using the artwork of Jamie Kidd
You buy her tubes here CILM
-----------------------


Open 600x600 canvas, now open up scrap kit pieces resize them first if needed, I opened the white paper frame, resized it down copy and paste to your canvas, grab your magic wand click the inside of your frame selections all float> defloat> modify expand by 3 copy and paste paper of choice, invert>delete drag paper above frame, add drop shadow. Now open your main tube of choice resize if needed add drop shadow now place on the side of the frame cropt the bottom of your tube we’ll hide that with another tube.


Now I used 3 different jamie kidd tubes.. I picked one laying down and I placed it down over the other tube to hide the bottom add a drop shadow, now open the pink heart frame resize if needed place at the opposite side of your frame, grab your magic wand click the inside of the heart selections all float> defloat> modify expand by 2 copy and paste paper of choice invert>delete drag layer below your heart frame, do the same and copy and paste your tube of choice, drag above layer. Add drop shadow to your heart and tube.


Now let’s open up some elements I used the black ribbon, pink ribbon on the button, glittery hearts, silver key, and silver heart, I got my text tool and typed out “Jamie Kidd Holds The Key To My” added any special effect you like to the text, I rotated my text to the side alittle bit use my tag for a reference, i resized the heart down and made it look like the heart was hanging off the my, to complete key to me “heart” I resized the key and placed it by the heart, give these drop shadows, resize your black ribbon, ribbon button and your glittery hearts and place them where you want them, now add your mask, copyrights and your name, now you can save as a PNG and you’re done!


Thanks for trying my tutorial.
Now lets see those results,
I hope you have enjoyed this tutorial!


-----------------------
This tutorial was written on July 30th, 2010 by Melissa.
In no way may this tutorial be copied to another
website without the creators permission. Any resemblance
to this tutorial is purely coincidental.

Thursday, July 1, 2010

Lithium


-->

This tutorial was written in PSP 9 and can be used with any other version.
I assume that you have a working knowledge of PSP.


-----------------------
Supplies Needed:
Tube of choice/close up
Hot scrapkit by Kristin
Find her “Lithium” kit Here
Template359 by Missy Here
fonts of choice, mask of choice
I used Becky_Mask022
Plugins Needed Optional:
Xero-radiance


-----------------------
I am using the artwork of Mark Wasyl
You can buy his tubes Here
-----------------------


Let’s open your template, resize if needed take off the wordart, image> canvas size, let’s click on the inside of both your squares to the left and right selections all float> defloat> copy and paste paper of choice, or flood fill, I used a gradient orange/red, now selections all float> defloat> copy and paste your tube of choice in each square, invert>delete select none. Now drag your tube layers below your paper/fill change blend mode to screen, add your radiance plugin settings of choice. Now add noise to your outter square frames again or sharpen them, add drop shadows close out of every layer but these squares and your tube and paper layers merge these.


Select your inner square selections all float> defloat> copy and paste paper of choice, invert>delete select none. Now do the same for the outer inner frame add noise then add a drop shadow to the outer frame, open up the “flame” element and place inside that square, close out of every layer beside the layers we were just working with, merge the inner square, now keep the merged layers closed, now select each circle each time selections all float> defloat copy and pasting your papers of choice to each circle invert>delete select none, closing out all layers and merged these to hide them while you work on the next circle etc etc, Now on the first circle on the outer “glittered” circle I used my paper of choice then I re added the noise to that layer, once you’ve added your papers to all of the 3 circles, add your main tube in front in the middle of the left and right squares resize if needed, add drop shadow.
Now time for the easy part, lets bring out all of the awesome elements, I used lips, diamond star, skull charm with flames, red ribbon, skull chain, skull with roses, red bottle, and silver glitters, now resize these if needed place where you want then now add a drop shadow. Now the chain with the skulls the diamonds in the eyes and the circles isn’t included in the scrapkit I added those myself, so use a diamond of choice recolor and resize and place inside the areas to look like mine. Now add your mask, your copyrights, add your name save as a PNG and you’re done
Thanks for trying my tutorial.
Now lets see those results,
I hope you have enjoyed this tutorial!
-----------------------
This tutorial was written on July 1st, 2010 by Melissa.
In no way may this tutorial be copied to another
website without the creators permission. Any resemblance
to this tutorial is purely coincidental.