Thursday, September 30, 2010

Naughty Student


This tutorial was written in PSP 9 and can be used with any other version.
I assume that you have a working knowledge of PSP.


-----------------------

Supplies Needed:
Tube of choice/close up
Scrapkit by Pimp'd Designz
Find her ptu “Teacher's Pet” kit Here
fonts of choice, Missy’s Temp287
Get this template at her blog Here


Plugins Needed Optional:
Mura’s - copies


-----------------------

I am using the artwork of Elias Chatzoudis
You can buy his tubes at www.mypsptubes.com

-----------------------


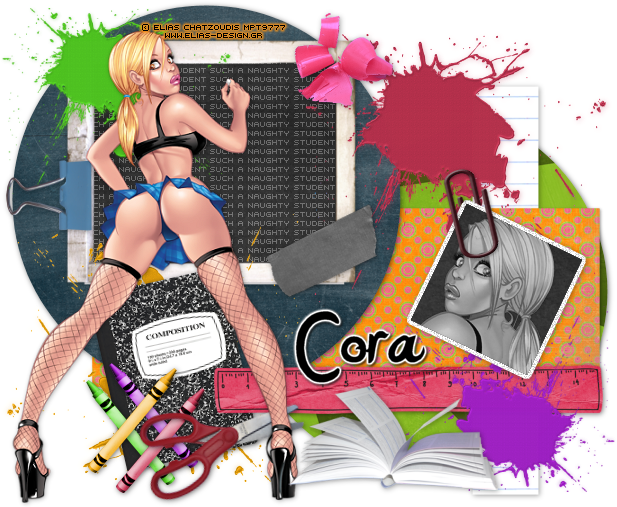
Let’s open the template, I got rid of her wordart and copyrights, the frames and small circles. Select the big pink circle on the left selections all float> defloat copy and paste paper of choice, invert>delete select none. Select the rectangle selections all float> defloat copy and paste paper of choice, invert>delete select none. Now do the same for the black circle and the longer rectangle. Now open up your scrap pieces I used the chalk board, crayons, clip, paint splats, ruler, notebook, open book, tape, crayon shavings, paper clip, scicors, now resize these place them around your tag where you want them now add drop shadow, I colorised all my paint splats and crayons.


Now place your chalk board where the frame was grab your text tool and type out “such a naughty student” go to your plugin mura’s copies, now click on your chalk board, use your magic wand click the inside where the black is now with the marching ants around the square, click back on your text layer selections invert>delete. Drag this later below everything but not your chalk board, lower the opacity.


I then used my preset tool set to square, make a square and use your deform tool and move it slightly to the side, selections all float> defloat> modify> expand by 3 add a new raster layer flood fill color of choice, selections none, drag this layer below your preset square add noise, then a drop shadow get your paper clip and place on the side made it look real by deleting some of the paper clip add a drop shadow before you crop it. now click on your preset square selections all float> defloat> copy and paste your tube of choice, invert>delete select none.


Now turn your tube black and white, add drop shadows to your squares now merge these, now resize your main tube down some place on your tag in front of your chalk board so it kinda looks like she wrote the words, add drop shadow now add your name copyrights and you’re done!


Thanks for trying my tutorial.
Now lets see those results,
I hope you have enjoyed this tutorial!


-----------------------
This tutorial was written on September 30th, 2010 by Melissa.
In no way may this tutorial be copied to another
website without the creators permission. Any resemblance
to this tutorial is purely coincidental.

Princess Of The Sea


This tutorial was written in PSP 9 and can be used with any other version.

I assume that you have a working knowledge of PSP.


-----------------------

Supplies Needed:

Tube of choice/close up

Great PTU scrapkit by Chassity

Find her “Under The Sea” kit Here

fonts of choice, sand of choice


Let’s open a 500x200 canvas, open up all your scrap pieces and your tubes.. I used the pretty little mermaid that came with her scrapkit, you can use any mermaid tube or any tube, now if you don’t have her scrapkit just follow along with different pieces. I opened what looks to be water waves so I resized them down, copied and pasted them on the canvas made sure they went all the way across, I then merged them added a drop shadow and opened up the tube resized it and placed on the left side.. I also added a drop shadow, now add a new reaster layer drag it to the very bottom flood fill color of choice, I choose a light blue. Now click on your tube and duplicate, then go to image>mirror this will flip the tube around, drag below your water layer and duplicate these tubes to make it look like a background, hide all layers besides your mermaid tubes in the background, merge and unhide everything on that layer change blend mode.


Now all you really need to do is open up all the pieces you want to decorate with, I used sea weed, white flower with yellow bead in the middle, bubbles, squirt of water, sea shell, crab, fish, achor, star fish and that’s it, the sand didn’t come with the scrapkit so use your own sand, resize all the scrap pieces down small so you can place them around on your forum set, then place your sand on the bottom so it looks like sand and sea… now I got my preset tool set at rectangle, but then I changed my style line, add new raster layer made a small rectangle across the forum set then messed with the blend modes, then added “Princess Of The Sea” in a pixel font that I also changed the blend mode too.. And once you’ve done all that you’re almost done, now add your name and your copyrights, now you're done!


Thanks for trying my tutorial.

Now lets see those results,

I hope you have enjoyed this tutorial!


-----------------------

This tutorial was written on September 30th, 2010 by Melissa.

In no way may this tutorial be copied to another

website without the creators permission. Any resemblance

to this tutorial is purely coincidental.

Wednesday, September 1, 2010

Play It Hard, Forum Style


This tutorial was written in PSP 9 and can be used with any other version.

I assume that you have a working knowledge of PSP.


-----------------------

Supplies Needed:

Tube of choice/close up

Great Ptu scrapkit by Cora

Find her “Play It Loud” kit Here

Fonts of choice.


Plugins Optional:

MuRa’s Meister – copies


-----------------------

I am using the artwork of Keith Garvey

You can buy his tubes www.mypsptubes.com

-----------------------


let’s open 500x200 canvas, now get your preset tool, set on rectangle, foreground null, background black, make a long but kinda skinny rectangle, now go to your deform tool and hover your mouse over the stick like thing in the middle and click and move with your mouse to move it on the side stretch it out making it fit from corner to corner, duplicate the rectangle and mirror it making it look like a big X in the background, merge these rectangles and name black X.


Now copy and paste paper of choice, drag below your X layer, now I clicked back on the X layer, selections all float> defloat click back on your paper layer and click on the canvas tab you need to right click on it and “cut” then select none, this will take away the whole background, but then I want you to click back on the top of the tab on your canvas and I want you to right click then “paste” it back now name this “red layer” or whatever paper color you picked, now look through your layer and there should be a red X layer, delete that, I used red paper so I had a red & black X layer, I got rid of the red layer.


Now I want you to drag the black X below your red layer, now I want you to give the red layer several drop shadows to make the effect of the black X looking how I made it. now let’s go back to your red layer, selections all float> defloat> copy and paste your tubes of choice until it covers all the red, invert>delete on each layer to take off the excess of the tube, now select none. Change the blade mode to hard light to all the tube layers.


Now grab your text tool, type out “play it hard” in a pixel font, place in the middle of your black X, convert to raster. Now get your plugin MuRa’s Meister – copies settings of choice, now click back on the black X, selections all float> defloat> invert now click on your text layer and hit delete, select none. Drag text layer below your red layer and tubes layer, now add your drop shadow to the text layer.


Now time for the fun part, add your main tube to the left side of, let’s open up your scrap pieces, I used the CD, heart with wings, music note, tickets, chain, and disco ball, now resize all of these if needed place them where you want them, merge everything now add borders if you want them, add copyrights then add your name save as a PNG and you’re done.


Thanks for trying my tutorial.

Now lets see those results,

I hope you have enjoyed this tutorial!


-----------------------

This tutorial was written on September 1st, 2010 by Melissa.

In no way may this tutorial be copied to another

website without the creators permission.

Any resemblance to this tutorial is purely coincidental