This tutorial was written in PSP 9 and can be used with any other version.
I assume that you have a working knowledge of PSP.
-----------------------
Supplies Needed:
Tube of choice/close up
Awesome FTU scrapkit by
Melissa at her blog HERE
Template416 by Missy get
her template at her blog HERE
Font of choice
Plugins needed are Optional:
photo effex - scanlines
xero - radiance
-----------------------
I am using the artwork of Keith Garvey
You buy his tubes here PTE
-----------------------
Let's open her template, i took some pieces off, but i left the 2 front circles, the 2 back squares and the middle square, get rid of the rest if you want, close out of the rest of your layers besides the 2 squares in the back. go and open your elements and papers then go open your tube. I used the glittery paper for both squares but as you can see it's different colors i used the top of the paper the orange on the left square then select>select all>float>defloat> copy paper and paste paper then invert>delete, select none. get rid of the template square. do the same for the other square but flip the glitter paper so its pink, then selections>all float>defloat copy and paste paper, then invert>delete, select none. get rid of the template square.
now i merged, then selection all float>defloat> modify>expand by 2 or 3 which ever you like, invert> add a new raster layer flood fill color of choice i used greenish, select none, drag below your paper layer, add noise then drop down shadow now merge these. let's open the middle square back up selections all float>defloat> invert, copy and paste the paper with the faded circles on them with the gradient, invert>delete select none.
now open your tube use a close up if you have one or just the tube itself place where you want it now invert> go to each tube layer you copied and pasted into the square and hit delete on your keyboard, gets rid of the excess tube, now select none. mess with your blend mode to which ever suits you best i think i used overlay then switched the tube b&w adjust> hue & saturation>colorize to black and white move the dial all the way to Zero.
now on the outer frame add noise then drop down shadow to frame, close out of your square layer merge the middle square layer now hide that too, so the square layers should all be hidden, by clicking the "eye" on the layers palette on the right hand bottom corner, now i want you to open the 2 circles on the left and right, merge them together selections all>float defloat> copy and paste tube of choice place where you want inside the circle while the matching ants are around the circles, now on each of your tube layers hit delete on your keyboard, now select none. now switch to black and white, lower opacity to your liking now go to your plugins photo effex> scanlines settings of choice, if you don't have this filter you can use texture effects> blinds.
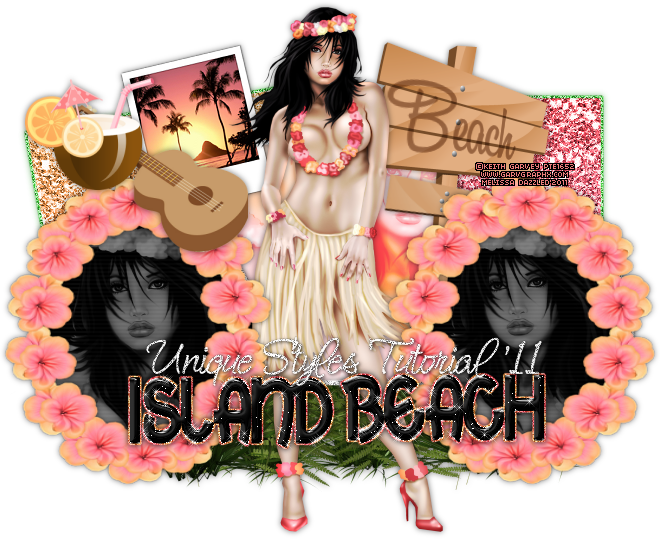
now time for the best part adding your elements resze them down if needed and just place them where you want on the tag i used the coconut drink, polaride picture, the banjo, grass, beach sign, and the folor circles, i placed it over the circle frame, i then used my deformed tool to make it fit perfectly around the circles, do this for each then add drop shadow and merge the circles, tubes and flower circles together, you should now at this point unnhide all of your other layers.
i also placed the grass area behind the circles and my main tube but not behind the middle square, add drop shadows to all elements, add your main tube i added plugins radiance to it settings of choice you don't have to do this though. resize the tag itself if needed now add your copyrights, add your name and save as a png and you’re done!
Thanks for trying my tutorial.
Now lets see those results,
I hope you have enjoyed this tutorial!
-----------------------
This tutorial was written on September 3rd, 2011 by Melissa.
In no way may this tutorial be copied to another
website without the creators permission. Any resemblance
to this tutorial is purely coincidental.

No comments:
Post a Comment