Showing posts with label PMTWS-CT. Show all posts

Tuesday, June 24, 2014

Bad Attitude - PTU


This tutorial was written in PSP 9 and can be used with any other version. I assume that you have a working knowledge of PSP.


-----------------------

Supplies Needed:
Tube of choice/close up


PTU Scrap kit by Designs by Sarah
"Adoraskull" At PMTW/S


Font of choice
Prime Script

Attitude wordart by Vaybs
Get it HERE

Plugins Optional:
Red paw media - RPM beautifier
Eyecandy 4000 - gradient glow


"Delete" on your keyboard under Insert.


-----------------------
I used the artwork of Ismael Rac
You can find his art HERE
-----------------------


*Working with  layers*


Open skull frame resize 80% Imag- canvas size 600x600
Open tube resize. copy & paste as new layer on your canvas
place tube in the enter. add gradient glow,  Adjust- add/remove noise
add noise. settings: uniform, monochrome clicked. noise at 67%
Effects- 3D effects- drop shadow, settings: 0, 0 , 66, 8, click OK to apply

Using eraser tool start erasing the parts of her legs you don't want
Layers- duplicate tube layer, drag your copied layer below the frame
On your original layer erase the tube so the frame starts to show
Go back to your copied tube layer and finish off erasing your tube so it
Looks as if her legs are hiding behind frame, but her head isn't.


Add a sharpen to your frame, Adjust- sharpeness- sharp
While your frame is selected, using your magic wand click on the
inside of your frame. also click the inside of the skulls eyes, now
Selections- modify- expand by 6, open paper of choice copy &
paste paper as new layer. selections- invert- delete. select none drag this
layer below your frame and tube layers. Now add gradient glow on the outside
of your frame, then add noise. Settings: random, monochrome clicked
noise set at 44% click OK then apply. adding drop shadow settings above


Now it's time to add the elements. I used: pink beads, flower clip
pink glitter smear, pink and black paper flowers, key on a string,
frame 1 and i used paper 7. Resize your elements down
Place them where you want or use my tag as a guide. Now merge all

This it optional.
I used RPM - beautifier
Settings: 56, 13, 73, 100, click OK to apply


Now add your copyrights, save as a PNG
add your name and now you're done!


Thanks for trying my tutorial.
Now lets see those results.

----------------------
This tutorial was written on June 24th, 2014 by Melissa.
In no way may this tutorial be copied to another
website without the creators permission. Any resemblance
to this tutorial is purely coincidental.

Monday, June 23, 2014

HeartBreaker - PTU


This tutorial was written in PSP 9 and can be used with any other version. I assume that you have a working knowledge of PSP.


-----------------------

Supplies Needed:
Tube of choice/close up


PTU Scrap kit by Alika
"Heart Breaker" At PMTW/S


Font of choice
SeasideResort NF


Plugins Optional:
Red paw media - RPM beautifier
pent.com - dot and cross


"Delete" on your keyboard under Insert.


-----------------------
I used the artwork of Keith Garvey
You can find his art HERE
-----------------------


*Working with tons of layers*


Open purple rectangle frame. resize 70%
Image- canvas size set to 600x600
Use deform tool and swirl the handle to the right an up
Drag it over a little bit, Layers- duplicate
Image- mirror. drag it out so it's on the other side

Using magic wand click inside of your duplicated frame
Selections- modify- expand by 10, open paper of choice
copy and paster as new layer, selections- invert- delete. select none
drag your paper layer below your frame. now do the same for your
other frame. choosing a different paper or the same paper.
I decided to flood fill with the color pink instead, and adding my tubes
 Changing blend mode to screen, adding penta.com - dot & cross

Open your main tube place in the center of the two frames
Now it's time to add your elements. I used: purple paper flower,
purple lips, dangerous beads, purple star, skull, lipstick,
paper flower with skull on it, heart, paper 5, frame (element35)

Resize these down place where you want, or use my tag as a guide.
Merge your whole tag then add this plugin of choice
RPM - Beautifer, Settings: 12, 75,  40, 100


Now add your copyrights, save as a PNG
add your name and now you're done!


Thanks for trying my tutorial.
Now lets see those results.

----------------------
This tutorial was written on June 23rd, 2014 by Melissa.
In no way may this tutorial be copied to another
website without the creators permission. Any resemblance
to this tutorial is purely coincidental.

Tuesday, June 10, 2014

Punky Misfit - PTU


 This tutorial was written in PSP 9 and can be used with any other version. I assume that you have a working knowledge of PSP.


-----------------------

Supplies Needed:
Tube of choice/close up

PTU Scrap kit by Digital Indulgence
"Misfit" At PMTW/S

Can you tell i love her masks? lol


Font of choice
Return to sender


Plugins Optional:
Red paw media - RPM beautifier


"Delete" on your keyboard under Insert.


-----------------------
I used the artwork of Keith Garvey
You can find his artwork Here
-----------------------


*Quick and Easy*


Let's open your frame 3
Image- canvas size set at 600x600
Grab your magic wand click the inside of your frame
Selections all- float- defloat- modify- expand by 9

Copy & paste paper of choice as new layer i used paper 11
selections-invert- delete- select none. drag below your frame layer
now add a gradient glow outside of your frame. I don't have this
plugin so i did it my own way. now using your magic wand click on
the glow area and add noise, Adjust- add/remove noise
random clicked, monochrome checked noise set at 25%
Now add a drop shadow and merge all of the layers.

Now let's open your main tube place in the middle
I also added a slight border around the tube. you can do
this if you have gradient glow. Using the same method, using your
magic wand clicking on the glow area and adding your noise.


Now it's time to add all of your elements i used. purple skull bow, 
trouble safety pin, purple paper star, barbed wire, label, 
paper 1 with the star and lines on it, blue nail polish, ric rac 2 (purple),
 skull 1, blue sequins,  papers 11 & 21

Resize your elements down placing them where you want or using
my tag as a guide. now on the paper with the star and lines on it
it just seemed a bit blank in the center. so with various fonts I typed out
some words these are what i used, Use these words or use your own
Punk, Misfit, Trouble, Rocker, Bitch


Once you've got your tag merged i added RPM beautifier settings of choice
But these are the ones i used, 19, 25, 40, 100


Now add your mask , copyrights, save as a PNG
add your name and now you're done!


Thanks for trying my tutorial.
Now lets see those results.

----------------------
This tutorial was written on June 10th, 2014 by Melissa.
In no way may this tutorial be copied to another
website without the creators permission. Any resemblance
to this tutorial is purely coincidental.

Thursday, May 1, 2014

Mile High Club - PTU

This tutorial was written in PSP 9 and can be used with any other version. I assume that you have a working knowledge of PSP.


-----------------------

Supplies Needed:
Tube of choice/close up

PTU Scrap kit by Designs by Sarah
"Enjoy Your Flight" At PMTW/S

Template 502  by Millie
Millie's PSP Madness

Mask set 5_3 by Rachel
Rocked by Rachel

Font of choice
Rosarian


Plugins Optional:
xero - radiance


"Delete" on your keyboard under Insert.


-----------------------
I used the artwork on Dominic Marco
You can find his artwork Here
(Sorry i realize he only has a few older/newer tubes up)
This tube was bought while he was with CILM
-----------------------


*Working with multiply layers (template)*


Open your template remove copy rights, layers 10, 9.
Reize your template, my percentage was 85% & 90%
then i went to Image- canvas size at 600x600


Now open all of the papers you plan to use 6 temp layers so 6 papers.
Now let's start with layer 8 and work your way back once you start
Selections- all- float- defloat copy & paste paper as new layer. 
selections- invert- delete- select none, delete the original layer 
(template layer) and add a slight drop shadow.

You will be doing the above step on all of your template layers..
no need to explain this. But on layers 5 & 4 i used the same papers.
 and 2 & 1 used another same paper on both pieces.


Now add your tube of choice. add slight drop shadow,
radiance settings:  85, 50, 128, 49 You can mess around with the settings.
I placed the tube kinda in the middle.

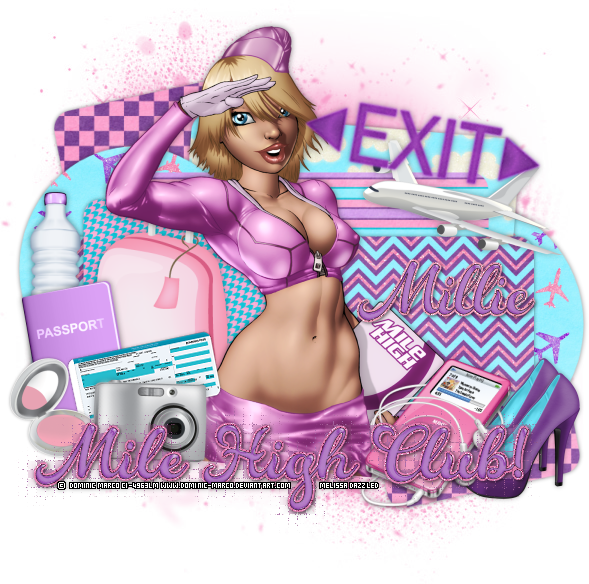
Now it's time to add your elements. I used, camera, ipod, high heels2 , passport, water bottle, exit sign, plane2, luggage2, boarding pass, blush compact,  papers 3,4,7,8,9 and 10

Resize your elements place them where you want or use my tag as a guide.
Now type out the words "Mile High Club" add your own effects.

Add your copyrights, mask, your name and you're done!


Thanks for trying my tutorial.
Now lets see those results.

----------------------
This tutorial was written on May 1st, 2014 by Melissa.
In no way may this tutorial be copied to another
website without the creators permission. Any resemblance
to this tutorial is purely coincidental.

Monday, April 28, 2014

I Heart Emos - PTU


This tutorial was written in PSP 9 and can be used with any other version. I assume that you have a working knowledge of PSP.


-----------------------

Supplies Needed:
Tube of choice/close up

PTU Scrap kit by Scraps By Danielle
"Emolicious" At PMTW/S

Template 220 by Kristin
Toxic Desirez


Font of choice
Clippers Script fat


Plugins Optional:
xero - radiance
penta.com - jeans
Filter Factory Gallery E - Metal Peacocks


"Delete" on your keyboard under Insert.


-----------------------
I used the artwork on Selene Vargo
You can find her artwork Here
-----------------------


*Working with multiply layers (template)*


Open your template resize 80%
Remove credits,  raster 9, 8 an copies of 8
I hide all layers but raster 7s Merge & hide
Unhide Raster 6s, Merge & hide
Unhide next two raster 5s, Merge & hide
Now unhide the rest of your layers including merged


Open all of the papers you would like to use and resize if needed
Now I like to start at the bottom, the first layer that you merged
Selections- all- float- defloat- copy & paste as new layer paper of choice
 selections- invert- delete. select none. delete original layer (template layer)
Now you will do this step on every layer of the template.  (but skip this on Raster 3)


Once you've gotten all of your template filled with paper. If you left raster 3 untouched
I want you to select it. Selections- all- float- defloat- add new raster layer, i choose two
colors of my scrap kit pink and blue. Using your paint brush, I painted one side pink other blue.
Adjust- add/remove noise- add noise. now choose settings of choice on this two colored layer.


Selections none. now selecting this layer again. Selections- all- float- defloat copy your
close up tube(s) of choice. copy & paste as new layer. Use your mover tool and drag
your tube where you want it to show. Selections- invert- select none. Now hide all of your
layers, besides the layers we were just working on and merge.


Now add your metal peacocks and penta.com - jeans effects. I messed around with these settings to get to where i liked. You will need to take this same step.


Now this is optional. on every layer of the template add a border, i did this my own way since i didn't use a plugin. You can use gradient glow an add noise to them. but again Optional,
If you decide not to do this then just add a slight drop shadow to your layers.

Open your tube. Resize if needed i had too. place in the center of your tag, i added a border around her, choose the color purple.  slight drop shadow. added slight radiance to the tube.


Now it's time to add the elements. I used the cupcake, lips, butterfly, I heart emo brad, spiked frame, tank top (i recolorized this) purple skull. both of the emo candies, Papers 1, 4, 5 & 6.

Resize elements down and place them where you want or use my tag as a guide.

You're done!


Thanks for trying my tutorial.
Now lets see those results.

----------------------
This tutorial was written on April 28th, 2014 by Melissa.
In no way may this tutorial be copied to another
website without the creators permission. Any resemblance
to this tutorial is purely coincidental.

Wednesday, April 16, 2014

Mermaids Delight - PTU


 This tutorial was written in PSP 9 and can be used with any other version. I assume that you have a working knowledge of PSP.


-----------------------

Supplies Needed:
Tube of choice/close up

PTU Scrap kit by Designs by Sarah
"Island Luau" At PMTWS

WSL_Mask219

Curved Text Tutorial

Font of choice
Gus

Plugins Optional:
xero - porcelain


"Delete" on your keyboard under Insert.


-----------------------
No artwork was used
-----------------------


Very easy simple tutorial


Image- canvas size 600x600
Open paper of choice i used paper 2
Add new reaster layer flood fill white
Copy and paste paper as new layer on canvas

Apply your mask, close out of your background layer (white) merge group
Now using deform tool resize the mask down smaller to your liking

I placed the mermaid in this kit on my canvas, and worked the mask around her adding slight drop shadow to her and plugin poreclain settings, 50, 73, 128, 0, 0, 255

Now start opening your elements. I used the mermaid, coconut, starfish,  chair, beach ball, drink3, flower1, 2, 3, and 7.  Leaf, leaf 3, life perserversun, sunglasses,. and paper 2.

Resizing your elements where you want or using my tag as a guide. Then using Gus font add "mermaids delight" at a curved angle near the top of your tag, I have wrote a tutorial on how to do this make sure you check it out in the supplies needed section.


Add your copyrights & your name.


You're done!


Thanks for trying my tutorial.
Now lets see those results.

----------------------
This tutorial was written on April 16th, 2014 by Melissa.
In no way may this tutorial be copied to another
website without the creators permission. Any resemblance
to this tutorial is purely coincidental.

Island Beauty - PTU


This tutorial was written in PSP 9 and can be used with any other version. I assume that you have a working knowledge of PSP.


-----------------------

Supplies Needed:
Tube of choice/close up

PTU Scrap kit by Designs By Sarah
"Island Luau" At PMTWS

Template "hibictemp" by Cakes
Only at Creative Misfits forum
Here


Font of choice
Good Vibrations ROB

Plugins Optional:

xero - radiance
xero - porcelain


"Delete" on your keyboard under Insert.


-----------------------
I am using the art of Elias Chatzoudis
You can find his work Here
-----------------------


Let's open template resize 85%
Image- Canvas size 600x600
Remove the copyright, and wordart
Remove the template line and glitter back

Select blue rectangle, Selections- all- float- defloat. copy and paste paper of choice as new layer. selections- invert- delete. select none. remove original layer.  I added a thin border but you can use a gradient glow.

Select the black square, Selections- all- float- defloat. copy and paste paper of choice as new layer. selections- invert- delete. select none. remove original layer.  While this layer is selected. selections- all- float- defloat. open close up tube of choice, copy and paste as new layer, invert- delete. select none. change blend mode to screen, Adjust- hue and saturation- colorize- both dials set at zero.


Select white circle, Selections- all- float- defloat. copy and paste paper of choice as new layer. selections- invert- delete. select none.  remove original layer. now selecting your outer black frame doing the same using a different paper choice. I added a border the outer frame paper, you can use a gradient glow if you have this plugin. I don't.

Now open up your main tube, place her in the center. I added plugins Radiance Settings 128, 50, 128, 67 and then Porcelain Settings 50, 73, 128, 0, 0, 255 then a slight drop shadow 0, 0, 18, 6, color black, shadow on new layer box unclicked.

Now it's time to add your elements. I used orange bikini, beach ball, coconut, drink1, flower2, flower7, netting,  palm frond, palm tree, pineapple,  shell2 (i colorized it blue), sunglasses, Papers i used were 2, 13, 20, and 23.


 Resize your elements, place where you want or use my tag as a guide
Add your copyrights & your name.


You're done!


Thanks for trying my tutorial.
Now lets see those results.

----------------------
This tutorial was written on April 16th, 2014 by Melissa.
In no way may this tutorial be copied to another
website without the creators permission. Any resemblance
to this tutorial is purely coincidental.

Tuesday, January 28, 2014

Sweet Sailor - PTU


 This tutorial was written in PSP 9 and can be used with any other version. I assume that you have a working knowledge of PSP.


-----------------------

Supplies Needed:
Tube of choice/close up

PTU Scrap kit by Inzpired Creationz
 "Welcome Aboard" PMTWS

DBV Mask 113

font of choice

I made this Template for this tutorial
Get Here

Plugins Optional:

xero - radiance
xero - porcelain
penta.com - color dot


Code Word: When ever i say "delete" You
are selecting delete on your keyboard under insert.


-----------------------
I am using the art of PinUp Toons
You can find his work Here.
-----------------------


*Working with multiple layers of a template*


Let's open the template I supplied, selecting your grey square. Selections all- float- defloat. open paper of choice. i choose paper 10 looks like wood resize 60%. or use a wood like texture. copy paste as a new layer, selections- invert- delete. select none. now select the outter layer "glow" then Adjust- add/remove noise- add noise. settings of choice. add a slight drop shadow. hide all of the circle layers and merge. unhide your circle layers.

I decided to just use the two big circles and the little circles inside. remove the other circles. I opened my main tube and placed in the center. added porcelain settings of choice. adding drop shadow, duplicated my tube, then Adjust-blur then Effects- texture effects- mosaic antique settings of choice. i left this layer above the circles.

Now selecting the big dark blue circle. selections all- float- defloat- open the paper you want to use i choose paper 9, resize if you want to first, then copy and paste as new layer on canvas, selections- invert- delete none. do this on both circles if the paper resize didn't fit both. now selected the white glow on the outside, Adjust- add/remove noise- add noise, settings of choice no drop shadow.


Now time to work with the inner blue circle. Selections- all- float- defloat- open the tube you want, and copy and paste as a new layer on canvas enough to fill the whole or just do it once. once you've got tube(s) where you want. selections- invert- delete (press delete on each layer if you pasted more than one tube at once) selections none. Close out all of your layers but the new tube layers, merge. now unhide all of your layers.


Changing blend mode to overlay. turn your tubes layer greyscale. Adjust- hue and saturation- colorize- both dials set at 0. Then i choose a color of the circle below the tube and i used my change to target brush. and i painted over the tubes layer a little bit to dull down the color as i didn't like what came out. you can skip this. now add color dot. and on the blue circle itself add a drop shadow. now HIDE your tube and duplicated layer. now you can merge all layers


Now unhide your tube, and start opening your elements. I used, bird 2 (i picked one bird from the pack), anchor 1, bottle, baskets, boq 3, shell candle, clock, clouds, compass (i turned greyscale), crab, lantern, life saver, netting 3,  paper 5 & 9.  Now resize all of these and place where you want or use my tag as a guide.  Now merge and hide merged piece, now add your mask. I then duplicated my mask layer only, Image- mirror then i closed and merged these together then i duplicated again Adjust- blur- gaussian blur set at 4. i then applied scanlines plugin this is optional.


Now add your copyrights, add your name and save as a png and  you’re done!


Thanks for trying my tutorial.
Now lets see those results.

----------------------
This tutorial was written on January 28th, 2014 by Melissa.
In no way may this tutorial be copied to another
website without the creators permission. Any resemblance
to this tutorial is purely coincidental.

Sunday, November 24, 2013

Caution - PTU

This tutorial was written in PSP 9 and can be used with any other version. I assume that you have a working knowledge of PSP.


-----------------------

Supplies Needed:
Tube of choice/close up

PTU Scrap kit by Grunge & Glitter
 "Women At Work" PMTWS

WSL_Mask238

font of choice

Plugins Optional:

xero - radiance
penta.com - jeans


Code Word: When ever i say "delete" You
are selecting delete on your keyboard under insert.


-----------------------
I am using the art of Michael Landefeld
You can find his work Here
-----------------------


*easy working with layers*


Let's open a frame. I used frame 1, resize to 80% Image- canvas size 600x600. using your magic wand click the inside of your frame selections- modify- expand by 7, Layers- add a new raster layer and flood fill color of choice. i used a light blue. selections- select none, drag below frame layer. while on flood fill layer. selections all- float- defloat. open the tube you want to use copy and paste as new layer on canvas, using your mover tool to drag the tube where you want inside the marching ants, selections invert- delete. select none, now drag your tube(s) layers below frame layer.

Change blend mode to the one you like. adding your penta.com- jeans settings of choice. add a slight radiance to your tubes. now open your fence element and resize this if you need too and paste as new layer on your canvas, dragging below your frame layer. add a drop shadow to your fence element. erase any extra if there is any hanging outside of the frame. merge


Now let's open the caution tape. resize if you need to place on the front of your merged layer, adding a light drop shadow. Open your main tube, i placed her in the middle. i had to erase some of her legs off, adding radiance, light drop shadow. now it's time to add the rest of your elements, I used the hard hat. dirt pile, frame 1, nut 1 and 2, metal bracelet, caution sign, sledgehammer, and paper 3. resize elemts down, place them where you want of use my tag as a guide.


Now add your mask i used dodge brush to lighten the color of the paper up, then i added a slight noise, add your copyrights, add your name and save as a png and  you’re done!


Thanks for trying my tutorial.
Now lets see those results.

----------------------
This tutorial was written on November 24th, 2013 by Melissa.
In no way may this tutorial be copied to another
website without the creators permission. Any resemblance
to this tutorial is purely coincidental.

Rainbow Kitty - PTU


This tutorial was written in PSP 9 and can be used with any other version. I assume that you have a working knowledge of PSP.


-----------------------

Supplies Needed:
Tube of choice/close up

PTU Scrap kit by Pimp'd Designz
 "Electric Kitty" PMTWS

WSL_Mask218

font of choice

Plugins Optional:

xero - radiance
penta.com - color dot


Code Word: When ever i say "delete" You
are selecting delete on your keyboard under insert.


-----------------------
I am using the art of Lady Mishka
You can find her work Here
Sorry no clue if she's selling anymore or not. 
-----------------------


*easy working with a few layers*


Let's open a frame. I used frame 4 resize down to 60% Image- canvas size 600x600. now  using your deform tool, swirl the frame to the left, by clicking what looks like a handle in the middle making the frame turn. once you've got it tilted the way you want, using your mover tool drag to the top alittle bit of where you want. now duplicate your frame layer, Image- mirror.  you should not have to use the deform tool on this, unless you want too.


Drag this frame later below the other one, looking at my tag for reference, place each frame near the corner of your canvas. Once you've got your frames where you want. merge, now opening your magic wand tool, click the inside of your frames. selections- modify- expand by 4. open the paper you want to use. I used paper 8. copy and paste paper on your canvas. selections- invert- delete. select none. drag below your frame layer.

Selecting your merged frames, selections- all- float- defloat- modify- expand by 2, open another paper of choice i used paper 3, paste on canvas, selections- invert- delete. select none. drag below your frame layer. Now adjust- add/remove noise- add noise. settings of choice. then add slight drop shadow to your second paper layer. Or you can use gradient glow. if you want instead of paper.


Now selecting your paper inside your frame. selections- all- float- defloat. now choose a tube you want, with a close up. copy and paste tube on your canvas, using your mover tool drag tube where you want inside the marching ants,  Do this again, You want to fill both frames at once, You can paste multi tubes at once to cover in the frame. once you've got it where you want it. selections- invert-  While each tube layer is selected, hit delete. select none. drag  each of the tube layers below paper layer.


Now hide all of your layers but your tubes. merge and unhide them all. on your tubes layer change blend mode to screen, add a radiance setting of choice. i also added penta.com - dolor dots. settings of choice. once you like how everything looks. selecting your purple frame sharpen and meger all of your layers.


Now it's time to add your main tube. i used the same tube. resized her down, placed in the center of my frames added radiance, and drop shadow. I know it looks bare. but this is when we add the elements. I used the rainbow, rainbow stars, butterfly, pink and purple paw prints, pink curly ribbon, papers 3, 8, 1, and frame 4. resize these elements where you want. I kept the rainbow slighty big and placed that in between where my frames connected, added a light drop shadow. made sure this was behind my tube layer.

Now resize the rest of your elements, place them where you want or use my tag as a guide. With the paw prints, i put each onre on the corner of the frame. you can place where you want. i changed the blend mode to hue i think. you can mess around with the different modes that fit you, add a slight drop shadow. merge all.


Now add your mask i added noise to my mask, add your copyrights, add your name and save as a png and  you’re done!


Thanks for trying my tutorial.
Now lets see those results.

----------------------
This tutorial was written on November 24th, 2013 by Melissa.
In no way may this tutorial be copied to another
website without the creators permission. Any resemblance
to this tutorial is purely coincidental.

Home For Christmas - PTU


This tutorial was written in PSP 9 and can be used with any other version. I assume that you have a working knowledge of PSP.


-----------------------

Supplies Needed:
Tube of choice/close up

PTU Scrap kit by Pimp'd Designz
 "Christmas Cheer" PMTWS


font of choice

Plugins Optional:

xero - radiance


Code Word: When ever i say "delete" You
are selecting delete on your keyboard under insert.


-----------------------
I am using the art of Elias Chatzoudis, I got this tube while 
he was with MPT. You can find this tube Here
-----------------------


*easy working with a few layers*


Let's open a frame. I used frame 3, resize 80% Image- canvas size set to 600x600, grabbing your magic wand tool click the inside of your frame, selections- modify- expand by 5, open the paper you are wanting to use, i resize down a little bit, copy and paste paper on your canvas, selections- invert- delete. select none drag below your frame layer. add drop shadow to your frame and merge both layers together.

Now open your main tube, resize if you need to place off to the side of your frame a little bit. depending on your tube position. i added radiance, settings of choice, and drop shadow. now it's time to add the elements. I used the tree, swirly sucker, flower 1, gift 2, lantern, ornament 2, paper 7, ribbon 3, santa's sack, star 2, and trim 2. Starting with the trim 2 resize down where you want, sharpen alittle bit. i added it to the bottom of my frame.

Covering the frame with the trim, erasing parts that are hanging off, add a slight drop shadow. once you've got it where you want it. duplicate and drag it slightly below the other. or above, just work with it and place it where you think it looks good. i opened the present element after i resized it, and place it in between those 2 trim layers, to make it look like the present was buried.

I also colorized the ribbons as you can see they are red, and i added noise to them. now just place the rest of the elements where you want, or use my tag as a guide.


Now add copyrights, add your name and save as a png and  you’re done!


Thanks for trying my tutorial.
Now lets see those results.

----------------------
This tutorial was written on November 24th, 2013 by Melissa.
In no way may this tutorial be copied to another
website without the creators permission. Any resemblance
to this tutorial is purely coincidental.

Monday, November 18, 2013

Poisonous Witch - PTU


This tutorial was written in PSP 9 and can be used with any other version. I assume that you have a working knowledge of PSP.


-----------------------

Supplies Needed:
Tube of choice/close up

PTU Scrap kit by Polkadot Scraps
 "Witch Girl" PMTWS

WSL_Mask105

font of choice

Plugins Optional:

xero - radiance
penta.com - color dot

Code Word: When ever i say "delete" You
are selecting delete on your keyboard under insert.


-----------------------
I am using the art of Alex Prihodki
You can find his work Here
-----------------------


*easy working with  layers*


Let's your diamond frame 3. i resized down to 50% image-canvas size set to 600x600. i then used my mover tool and dragged the frame on the upper left side. duplicated and dragged the other frame down diagonal bottom right side. merge together. using your magic wand click on the inside of each frame circle- selections- modify- expand by 8. open the paper of your choice. i choose paper 7. copy paste on your canvas, selections- invert-delete. select none. drag below your frame layer.


Now it's time to open your close up tube of choice, switching back to your diamond frame layer. using your magic wand again click inside of the frame. selections- modify- expand by 8. Now selecting it copy and paste onto your canvas, using your mover tool drag where you want inside the marching ants, then selections- invert-delete. select none. drag below your frame layer. changing blend mode to screen.  Adjust-hue and saturation- colorize  both dials set at zero. adding slight radiance, and color dot. settings of choice. adding slight drop shadow to your frame layer and now merging all together.

Now it's time to add your main tube. resize down add your plugins, drop shadow. i placed hr in the center. erasing some of her skirt. now it's time to add your elements. I used the cat, spider web, spider, green bow, witch hat, moon, purple flower, cauldron, canelabra, frame 3, paper 7 and 3 and potion, resize these down, place them where you like or use my tag as a guide.


Now add your mask,  copyrights, add your name and save as a png and  you’re done!


Thanks for trying my tutorial.
Now lets see those results.

----------------------
This tutorial was written on November 18th, 2013 by Melissa.
In no way may this tutorial be copied to another
website without the creators permission. Any resemblance
to this tutorial is purely coincidental.


Beautiful Fall - PTU

 This tutorial was written in PSP 9 and can be used with any other version. I assume that you have a working knowledge of PSP.


-----------------------

Supplies Needed:
Tube of choice/close up

PTU Scrap kit by Polkadot Scraps
 "Fall Days" PMTWS


font of choice

Plugins Optional:

xero - radiance
penta.com - color dot

Code Word: When ever i say "delete" You
are selecting delete on your keyboard under insert.


-----------------------
I am using the art of Martin Abel
You can find his work Here
-----------------------


*easy working with  layers*


Let's your double polaroid picture frames. canvas size 600x600 using your magic wand. click the inside of bth frames. selections- modify- expand by 8. choosing paper of choice. i used paper 11. i resized it down a little bit. copy paste on your canvas. selections- invert-delete. select none. drag below your frame layer.


Opening your tube/close up of choice. Using your magic wand again, while frames are selected click the inside, selections- modify-expand by 8 copying your close up tube of choice. paste on your canvas using your mover tol to drag tube where you want it to go inside the marching ants. once you've got it, selections- invert-delete, select none. drag your tubes below frame layer. above paper. change blend mode to soft light. depending on your liking. i then went to  Adjust- hue and saturation- colorize both dials set at zero.

Now while both tube layers are selected inside your frame. add a radiance and color dot settings of choice. now add a slighty drop shadow to the frame and merge all of these layers together. Now it's time to add your main tube. I placed my tube on one side of the frame. her elbow fit perfect on the side like she was standing inside of the frame. i had to erase some of the tube to get this sort of effect.


Adding slight radiance and drop shadow to your main tube.. Now it's time to add the elements. I used the wordart that came with the kit "Beautiful" , owl 1, acorn, flower 4, frame 4, leaves 1, paper 11, ricrac, scattered leaves 3 and 4, resize these elements down to where you like them placing them where you want, or using my tag as a guide.


Now add your copyrights, add your name and save as a png and  you’re done!


Thanks for trying my tutorial.
Now lets see those results.

----------------------
This tutorial was written on November 18th, 2013 by Melissa.
In no way may this tutorial be copied to another
website without the creators permission. Any resemblance
to this tutorial is purely coincidental.


Tuesday, October 29, 2013

3 Wishes - PTU


 This tutorial was written in PSP 9 and can be used with any other version. I assume that you have a working knowledge of PSP.


-----------------------

Supplies Needed:
Tube of choice/close up

PTU Scrap kit by Designs by Sarah
 "Genie in a bottle" PMTWS

Kristin's Template 213

font of choice

Plugins Optional:

xero - radiance
xero - fritillary


-----------------------
I am using the art of Elias Chatzoudis
You can find his work Here
-----------------------


*easy working with template layers*


Let's your template, i resized it down to 80% this should set canvas size to 600x600 with the resize, Since we're mainly working with the template layers will be easy, remove credits, close out of all layers but your last 2, which should be the 2 purple rectangles. MERGE then add your fritillary plugin, add a border then drop shadow and hide. Unhide next two blue ones MERGE, then add a border of your own. now hide this later.  MERGE these layers, selections- all float- defloat now  I opened my tube and choose the main tube so it'd be smaller and put her in the rectangle. copy and paste your tube on your canvas, using your mover tool and move the tube where you want it to go inside the rectangle, selections invert-delete. select none. each tube adjust- hue and saturation- colorize- both dials set at zero. then mess with blend modes of the tube. now add a border of your choice. MERGE all of them together.


Unhide next 2 blue squares, MERGE. selections- all float- defloat, open the paper you want, copy and paste paper on canvas, selections- invert- delete. select none. remove temp layer. now you have your paper squares. again, add a border of choice, now to the next few layers merging them, pasting paper onto the template as you did above with the blue squares. There is no need to repeat each step. Once you've finished the rest of your layers unhide the next 3. long black rectangle and 2 circles. hide the circles. now open another paper this paper had buldings on it. selecting your template layer selections- all- float- defloat, copy and paste tube on canvas, selections- invert- delete. select none. remove template layer. add a border of choice now hide this layer.


Now opening the first circle adjust- add/remove noise- add noise. settings of choice. or just sharpen this layer since the resize dulled the "glitter" now add slight drop shadow and hide. Unhide the black circle. Selections- all- float- defloat choose another paper of choice, copy papter paste on canvas. selections- invert- delete. select none. remove temp layer. now open your tube i used a close up tube of the same tube i plan on using. while your paper circle is selected. selections- all- float- defloat copy and paste close up tube on canvas, selections- invert- delete. select none.

I then went to adjust- hue and saturation- colorize- both dials at zero. then changed my blend mode to fit my needs, as i don't remember which i used. i also added slight radiance. i just love how this tube throws through the beautiful paper. now go back unhide all of your layers each adding a slight drop shadow if you want. then you should merge all of them..


Now it's time to add your main tube place off to the side, add slight drop shadow, radiance, now time for the elements, i used both word arts, lamp, lamp charm, pink swirl, purple ribbon, diamond, butterfly, magic carpet, pink smoke, swirly frame, blue smoke, paper 2, 4, 3, 8. now resize your elements down where you want, place them where you want. or use my tag as a guide. now MERGE visable.


Now add your copyrights, add your name and save as a png and  you’re done!


Thanks for trying my tutorial.
Now lets see those results.

----------------------
This tutorial was written on October 29th, 2013 by Melissa.
In no way may this tutorial be copied to another
website without the creators permission. Any resemblance
to this tutorial is purely coincidental.

Friday, September 27, 2013

Comic Book Hottie - PTU


 This tutorial was written in PSP 9 and can be used with any other version. I assume that you have a working knowledge of PSP.


-----------------------

Supplies Needed:
Tube of choice/close up

PTU Scrap kit by Designs by Sarah
"Boom! Pow! Click Here

font of choice
Kids Play

Plugins Optional:

xero - radiance
penta.com - color dot

Photoshop Comic Book Effect Tutorial
(Is not my tutorial, again this is optional)


-----------------------
I am using the art of Mark Wasyl
You can find his work Here 
But he is no longer selling his tubes
-----------------------


*easy working with layers*


Let's open your frame that looks like a comic book page. Use a different one if you don't have this one... I resize down to 80% Image- canvas size set 600x600. Opening all of the tubes you want to use, I used 5 different tubes. Using your magic wand click on the inside of one piece of the frame, Selections- modify- expand by 4. copy and paste your tube of choice in the marching ants of the frame you selected. selections- invert- delete. select none drag below frame layer.


The frame i used has 6 frames in one. If you are using this same frame. I want you to repeat the first step until all of your tubes are filled in all of the frame pieces. hiding your frame merge all of your tubes together, unhide frame. While your frame is highlighted using your magic wand tool again, clicking inside of each frame, selections- modify- expand by 4. I then added a new raster layer. tok the colors from my tubes, and flood filled each frame with the color of the tube that's in there. I used green, blue, yellow for both of the middle frames, purple and red. once you flood fill select none. drag below frame layer.


This is just to fill in any gaps you may have, if you didn't fill in the spot with your tubes... Now it's time to add the comic book effect on the tubes, Please go up in the supplies to view the tutorial for this. I opened photoshop for this. First save your merged tube layer,  Then i opened it into my PS and i followed the tutorial I shared to get the desired effect i want. I played around with the settings but it came from this tutorial


Once you do this effect, it's completely optional. save it in photoshop, then open it back into paintshop, and copy and paste onto your canas and drag below your frame, with the mover tool making sure everything fits right in. I then hide my frame layer, and merged the background with my tubes layer. If you haven't noticed by now. I selected one of the spots to put a city scene instead of a tube, You may do this also. then i added color dot to the yellow background, which i used a paper, but you can do this to a flood fill color of yellow if you want. giving the buildings a slight drop shadow. If you decide to do this.


Now it's time to add your main tube, i used the super girl. placed her where i wanted, added a slight radiance, drop shadow. now it's time to add the elements, i used these word arts, wham!, pow, boom, pop, word bubble 1, blue splat, yellow lightening bolt, frame, city scene and paper 1.  resize these down, place them where you want or use my tag as a guide, adding slight drop shadow.


Now add your copyrights, add your name and save as a png and  you’re done!


Thanks for trying my tutorial.
Now lets see those results.

----------------------
This tutorial was written on September 27th, 2013 by Melissa.
In no way may this tutorial be copied to another
website without the creators permission. Any resemblance
to this tutorial is purely coincidental.
Friday, September 20, 2013

Pamper Me - PTU


 This tutorial was written in PSP 9 and can be used with any other version. I assume that you have a working knowledge of PSP.


-----------------------

Supplies Needed:
Tube of choice/close up

PTU Scrap kit by Designs by Sarah
"Bathing Beauties" Click Here

DBV Mask 111

font of choice

Plugins Optional:
xero - fritillary


-----------------------
I am using the art of Pinuptoons
You can find his work Here
-----------------------


*easy*


Let's open the tub, this is your base of the tag. If you aren't using this scrapkit use antother tub or something for her to sit on, Resize the tub down to your liking, now image- canvas size 600x600, Let's open your tube. resize if needed, this one fit just perfect no placed her at the end of the tube. to make it look like she's sitting on the edge of the bath tub. give a little drop shadow on both.


Now it's time to add all of the other elements. I used all of the bubbles, mirror, cat, champagne glass, bottles 1, 2, 3, 4, a flower 1, rubber ducky(which i recolored this) stack of towels, dollie, and towel hanger in the back. Now resize them down where you'd like. Let's start with the mirror. place on the opposite side of your tube. you also want to mirror the tube you want to stick inside the mirror if you want it like mine. Now just place all the other elements where you want. or use my tag as a guide.


Now once you've got everything, how you want it. You can merge all layers now, open your dollie i used my deform tool and deformed it down to where it kinda looks like a bathroom rug so you can do this too. Once you have this hide it behind your merged layer with a slight drop shadow now merge this with the rest.


Then this tag isn't quite a bathrom with the tiling walls in the back right? you want to add your paper or just flood fill a color. I just added a new raster layer, floor fill with color from the tag, then i applied fritillary .


I don't remember my exact settings, But i went in and tried one similar these are the settings, Granularity- 18 Aggression- 15 Tesselation- 10 and Variation- 16. To get  a better effect i'd mess with the granularity dial that makes the tiles big or not. also varation changes all the colors a different color. So now you should be done! In the end i added more bubbles around on the mask, now you can merge all


Now add your copyrights, add your name and save as a png and  you’re done!


Thanks for trying my tutorial.
Now lets see those results.

----------------------
This tutorial was written on September 20th, 2013 by Melissa.
In no way may this tutorial be copied to another
website without the creators permission. Any resemblance
to this tutorial is purely coincidental.

Thursday, September 19, 2013

Witch Way - PTU

 This tutorial was written in PSP 9 and can be used with any other version. I assume that you have a working knowledge of PSP.


-----------------------

Supplies Needed:
Tube of choice/close up

PTU Scrap kit by Pimp'd Designz
"Wicked Lil Witch" Click Here

DBV Mask 111
flame element of choice

font of choice

-------------------------

Plugins Optional:
xero - radiance
penta.com - color dot
mura meister - cloud


-----------------------
I am using the art of Elias Chatzoudis
You can find his work Here
-----------------------


*easy*


Let's open your purple glitter frame. resize it down. image- canvas size set to 600x600, using your deform tool swing it to the left to tilt the frame place where you want on your canvas i then duplicated the tube and mirrored it facing the opposite direction. once you've got it where you's like. merge both together, using your magic wand click each part inside of the frames. selections- modify expand by 3 add a new raster and flood fill this layer of any choice because it won't stay this way anyways. selections- none. drag below your frames layer.


Now with your flood fill layer selected. selections- all- float- defloat now open Muras copies - cloud settings the way they are, But change the FG and BG colors.. i used green and purple to kinda match my scrapkit and tube you and choose which ever spooky colors you want. now apply your color dot settings of choice. now select none, once you've done this select your frame layer again selections- modify- expand by 3 add a new raster layer flood fill color of choice, selections none. drag below frame layer, add noise and a slight drop shadow and merge.


Now it' time for your main tube i placed her in the middle of the frames. added radiance and a drop shadow. not it's time for the elements. I used the spider web (in which i changed the color) spiker, moon and bats, frog, cat, cauldron, candle, frame 3, paper 3,  sparkles, fence, pink and black ribbons. I also used a flame tube for the candle that came with PSP. So, sorry this is not included in the kit or on the candle.


Now resize your elements down placing them where you want or using my tag as a guide, adding drop shadow to all, and a slight radiance to the elements to make them pop a little bit.


Now add your mask, and copyrights, add your name and save as a png and  you’re done!


Thanks for trying my tutorial.
Now lets see those results.

----------------------
This tutorial was written on September 19th, 2013 by Melissa.
In no way may this tutorial be copied to another
website without the creators permission. Any resemblance
to this tutorial is purely coincidental.


Wednesday, September 18, 2013

Hula Honey - PTU


 This tutorial was written in PSP 9 and can be used with any other version. I assume that you have a working knowledge of PSP.


-----------------------

Supplies Needed:
Tube of choice/close up

PTU Scrap kit by Pimp'd Designz
"Hula Honey" Click Here


Plugins Optional:
xero - radiance


-----------------------
I am using the art of Chris Harper, this is an exclusive tube for the
Graphic Groupies... But you can find his work Here
-----------------------


*easy*


Let's open your frame, resize down, using your deform tool swing the frame to the left to make it not straight, or leave it how it is. now image- canvas size set at 600x600, using your magic wand click on the inside of the frame, selections- modify expand by 6 copy and paste paper of choice, invert- delete- select none. drag this layer under your frame layer. also add 2 gradient glow colors of choice around the frame using your magic wand click on the glow colors you added if you wanna add noise for a glittery effect. now add a drop shadow to this and merge.


Now it's time to add our elements, i used sand, net, coconut, leaves, palm tree, flowers, blue glitter circle, flip flops, flower 2 and 6, frame 1, paper 11, sea star, string and torch and bubbles. resize down where you'd like adding slight drop shadow, place them where you want or use my tag as a guide. now resize your main tube place where you want. add drop shadow and a slight radiance


Now add your copyrights, add your name and save as a png and  you’re done!


Thanks for trying my tutorial.
Now lets see those results.


----------------------
This tutorial was written on September 18th, 2013 by Melissa.
In no way may this tutorial be copied to another
website without the creators permission. Any resemblance
to this tutorial is purely coincidental.

Saturday, August 24, 2013

Devilish Inside - PTU


This tutorial was written in PSP 9 and can be used with any other version. I assume that you have a working knowledge of PSP.


-----------------------

Supplies Needed:
Tube of choice/close up

PTU Scrap kit by Inzpired Creationz
"Horny Lil Devil" Click Here

font: Gimme danger


Plugins Optional:
xero - radiance
penta.com - color dots


-----------------------
I am using the art of Mark Wasyl, He doesn't sell his tubes anymore sadly
But you can find his artwork Here
-----------------------


*may be difficult*


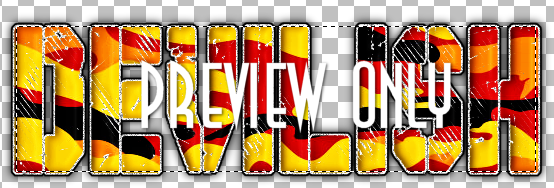
Let's open a 600x600 canvas, bring out your text tool and type out in caps DEVILISH. in the font i used, or a thick soild font. once you got that typed out, i used the deform tool around it and i stretched out the word alittle bigger where i wanted it to go. Layers- convert to raster layer. selections- all- float- defloat. copy and paste your paper of choice, selections- invert- delete. select none. now remove the original layer (font) selecting the paper layer now. Selections- all- float- defloat- modify- expand by 3, add a new raster layer flood fill color of choice. i choose white. selections none. drag below your devilish paper layer.


Now on the white layer adjust- add/remove noise- add noise. settings of choice. on this layer. Selections float- defloat modify- expand by 2 add a new raster layer again now flood fill black. selections none. drag below all of your layers. duplicate the black now add a slight drop shadow. Now with your paper layer selected. Effects- 3D effects- inner bevel settings of choice. Your text should look something like this.


Now it's time to merge all of your layers. now i want you to go to your selections tool, the one that looks like a square, selection type: rectangle. mode: add (shift) feather: 0 Now i want you to start your tool at the top left of the D but on the text only don't go over the white part. Should look something like this with all of the marking ants around your text


Now add a new raster layer floor fill color of choice. i choose black. selections none. now drag this layer below your text layer.i want you to open your chicken wire element. Resize first if needed, now With your black layer selected, selections all- float- defloat now copy your wire element and paste on top of the black, while marching ants still up, paste more that one using your move tool sliding the wire where you'd like. I left my font up so i could see where the chicken wire would show through.


Once you've got all the pieces where you'd like, selections- invert- delete now do this on each layer of your chicken wire, to remove any excess. now select none. i did the same steps as the chicken wire element and i added the tube on the black layer with penta.com- color dots. I won't be explaining this. If you want this go ahead and do this now.


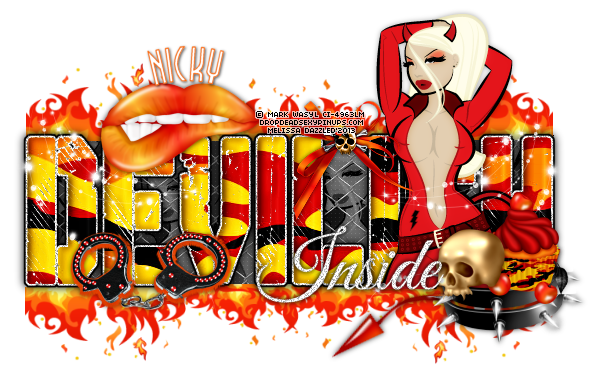
Now it's time to add the elements. I used the biting lips, vector flames, devil tail, cherry cupcake, skull, hand cuffs, skull bow, spiked collar, chicken wire, sparkles 2, paper 12. Now resize these other elements, place them where you'd like or use my tag as a guide. after i added all of my elements, i then placed my main tube off to the side to hide the excess of the tube. Then after all of this i typed out "Inside" added noise, drop shadow and placed in front of the tube i used, which i added a slight radiance to the main tube and drop shadow.

Now add your copyrights, add your name and save as a png and  you’re done!

Here is another example using a different tube


Thanks for trying my tutorial.
Now lets see those results.


----------------------
This tutorial was written on August 24th, 2013 by Melissa.
In no way may this tutorial be copied to another
website without the creators permission. Any resemblance
to this tutorial is purely coincidental.

I Heart Boys - PTU

 This tutorial was written in PSP 9 and can be used with any other version. I assume that you have a working knowledge of PSP.


-----------------------

Supplies Needed:
Tube of choice/close up

PTU Scrap kit by Designs by Sarah
"Back2School- PINK" Click Here

DBV Mask 111

Fonts of your choice
Diagonal Patterned Brick Texture


Plugins Optional:

xero - radiance
xero - moodlight


-----------------------
I am using the art of Keith Garvey
You can find his artwork Here
-----------------------


*easy*


Let's open the main element pieces, I used the chalk board, now resize down alittle bit, we will stretch this out later. now open a 600x600 canvas size. open the texture you'd like to use. as you can tell i changed mine pink, resize down a bit it is a huge texture, Paste on your canvas. now apply your mask. Now you should have a masked background of the brick wall. Now copy and paste your chalk board, place near the top. then using your deform tool stretch the bottom down so it makes it alittle large. add drop shadow.


 Now using your magic wand click on the inside of the board, the green part. now choose a close up tube of choice, paste drag tube where you'd like, now selections- invert- delete. select none. Now go to adjust- hue & saturation- colorize both dials set at zero. changes your tube greyscale. Now effects- artistic effects- solarize- settings 117. now change blend mode to screen. now back into Effects- edge effects- enhance once. should have a chalk like image on your board. now merge with your board


Paste your main tube of choice off to the side, adding xero- moodlight settings below. 


now add a slight radiance, settings of choice. slight drop shadow. Now it's time to add all of the other elements. I used pink and black flowers, calculator, scissors, paper, highlighter, high heel, stapler, book bag, stack of books, ruler, pen and note pad. Resize down where you'd like and place them where you want or use my tag as a guide.


I also used the butterfly doodle on the background of the texture tried to make it look like graffiti. then changed the blend mode. Then i typed out i heart boys on the piece of paper. Then using my pen tool color set to grey, and made a small diagonal line in the corner of the paper, with a drop shadow to make it look stapled.


Now add your copyrights, add your name and save as a png and  you’re done!


Thanks for trying my tutorial.
Now lets see those results.


----------------------
This tutorial was written on August 24th, 2013 by Melissa.
In no way may this tutorial be copied to another
website without the creators permission. Any resemblance
to this tutorial is purely coincidental.