Showing posts with label FTU Scrapkit. Show all posts

Wednesday, May 15, 2019

Dead Men Template by Me

I was doing a scrapkit challenge in a forum,
 and i made a template to use for my tag.
Preview of template below.

Download → Here
There is not tutorial. But if you'd like to recreate you can.
Please give a link back to this tag as credit if you do.

FTU Scrapkit "Pirate Cove" by Gimpstastic
Artist "Alehandra Vanhek" S&Co
Font: Wild ones


Tuesday, August 7, 2018

Simply Beautiful Cluster Frame

My mojo is lacking, So i tried to make a cluster frame and it turned out decent.
Please link back if used in Forum Challenges Or if you use it in a tutorial. 
Same rule applies. Hope you enjoy

Scrapkit i used from Tammy Kat "Simply Beautiful"
Grab this Freebie kit → HERE (3rd kit down)


Right click and Save. 


Skulls N Bones Cluster Frame

My mojo is lacking, So i tried to make a cluster frame and it turned out decent.
Please link back if used in Forum Challenges Or if you use it in a tutorial. 
Same rule applies. Hope you enjoy

Scrapkit i used from Tammy Kat "SkullsNBones"
Grab this Freebie kit → HERE


Right click and Save. 


Saturday, January 27, 2018

Loving You Wordart 2018

Loving you Wordart
Grab my wordart → Here

Scrapkit by Lady Hawk Grab her kit → Here 
(Last scrapkit on the page)
Freebie tube from Alehandra Vanhek Grab this tube → PFD
(I know it says 1.00 but when you click add to card download pops up)


Thursday, April 20, 2017

420 Fairy Snags

Whipped up this 420 themed taggie. Scrapkit freebie's by Toxic Desirez 

I used elements and papers from both of these kits
"Cannabis" it's the last kit on the bottom Here
and "Smokin Hot" Grab Here  420 Fairy is not within the kits.. 
I made that. But the other text within the kit is in one of those scrapkits

Tube i used is an Exclusive tube to The Creative Chicks

⇩⇩Scroll down for SNAGS⇩⇩


I also made a FB Avatar & Cover


→Snag Tags←


Sunday, February 26, 2017

Ptu now Ftu - Poisonous Witch


This tutorial was written in PSP 9 and can be used with any other version. I assume that you have a working knowledge of PSP.


-----------------------

Supplies Needed:
Tube of choice/close up

Ptu nor Ftu kit by Polkadot Scraps
 "Witch Girl" Here

Last kit on page

WSL_Mask105

font of choice

Plugins Optional:

xero - radiance
penta.com - color dot

Code Word: When ever i say "delete" You
are selecting delete on your keyboard under insert.


-----------------------
I am using the art of Alex Prihodki
You can find his work Here

Tube i used is Here
-----------------------


*easy working with  layers*


Let's your diamond frame 3. i resized down to 50% image-canvas size set to 600x600. i then used my mover tool and dragged the frame on the upper left side. duplicated and dragged the other frame down diagonal bottom right side. merge together. using your magic wand click on the inside of each frame circle- selections- modify- expand by 8. open the paper of your choice. i choose paper 7. copy paste on your canvas, selections- invert-delete. select none. drag below your frame layer.


Now it's time to open your close up tube of choice, switching back to your diamond frame layer. using your magic wand again click inside of the frame. selections- modify- expand by 8. Now selecting it copy and paste onto your canvas, using your mover tool drag where you want inside the marching ants, then selections- invert-delete. select none. drag below your frame layer. changing blend mode to screen.  Adjust-hue and saturation- colorize  both dials set at zero. adding slight radiance, and color dot. settings of choice. adding slight drop shadow to your frame layer and now merging all together.

Now it's time to add your main tube. resize down add your plugins, drop shadow. i placed hr in the center. erasing some of her skirt. now it's time to add your elements. I used the cat, spider web, spider, green bow, witch hat, moon, purple flower, cauldron, canelabra, frame 3, paper 7 and 3 and potion, resize these down, place them where you like or use my tag as a guide.


Now add your mask,  copyrights, add your name and save as a png and  you’re done!


Thanks for trying my tutorial.
Now lets see those results.

----------------------

Ptu now Ftu 2/26/2017
This tutorial was written on November 18th, 2013 by Melissa.
In no way may this tutorial be copied to another
website without the creators permission. Any resemblance
to this tutorial is purely coincidental.

Ptu now Ftu - Golden Road


 This tutorial was written in PSP 9 and can be used with any other version. I assume that you have a working knowledge of PSP.


-----------------------

Supplies Needed:
Tube of choice/close up

Ptu now Ftu kit by Polkadot Scraps
"Wizard Of Oz" Click Here
4th kit down


Fonts of your choice


Plugins Optional:
Xero - radiance


-----------------------
I am using the art of Jasmine Becket-Griffth
You can find her artwork Here
Tube i used found Here
-----------------------


*easy*


Let's open the window like frame. then paper, on your frame resize by 80% image> canvas size 600x600, now i used my drag tool and i dragged the frame up alil bit. you can do this at the end to see where you like it. now click on the inside of your frame selections modify> expand by maybe 4, now add a new raster layer. on this raster layer paste into selection. used paper 3. with a meadow and clouds in the background. selections none. drag below frame. add drop shadow to frame. now open the emerald city and place in the background, maybe erase some of the bottom off to kinda blend in wth the background but we'll be covering most of it up anyways. close out of the emerald city and merge the rest. so you can always edit it later where you want the city to go.


Now open your tube, use the one i used.. or another one. or the popeyewong one i supplied for you. resize if needed and place off to the side of your frame. add a drop shadow and slight radiance. now time to open some of your oz elements. like the lion, scarecrow, yellow bricks, tin can, scatter of hearts 1, flowers 1,2,3,4. and paper 6. now resize them down where you like. add the flowers around the bottom of your tube if you'd like. adding drop shadow to all your pices. you can place them where you want or use my tag as a guide


Now add your mask, copyrights, add your name and save as a png and  you’re done!


Thanks for trying my tutorial.
Now lets see those results.


-----------------------
Ptu now Ftu 2/26/2017
This tutorial was written on May 29th, 2013 by Melissa.
In no way may this tutorial be copied to another
website without the creators permission. Any resemblance
to this tutorial is purely coincidental.

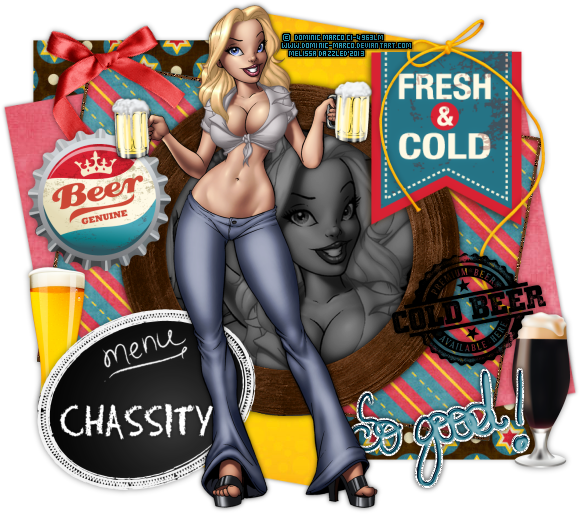
Ptu now Ftu - Bar Maid


This tutorial was written in PSP 9 and can be used with any other version. I assume that you
have a working knowledge of PSP.

-----------------------
Supplies Needed:


Tube of choice/close up


Ptu now Ftu kit by Polkadot Scraps
"Genuine Draft" Click Here
 2nd kit down


Fonts of your choice

Plugins Optional:
Xero - radiance


-----------------------
I am using the art of Dominic Marco
You can find his tubes Here
-----------------------


*May be difficult, Working with multiple layers*

Let's open the template resize by 80% now go to image- canvas size set at 600x600. let's take
off a few things. first remove the credits. the game on text and the circles the text appears
on. Hide all of your layers but the last two black rectangles and merge these and rename them
"merged 1" hide this and unhide the next two layers, which should be two purple squares.
merge these together rename this "merged 2" hide this layer. unhide the next two pink
rectangles. merge once again and rename "merged 3" now unhide all of your layers.


You should have 3 merged layers. raster 5 layer and copy of raster 1. hide raster 5 and 1.
While merged 1 is selected, go to selections all- float- defloat copy and paste paper of
choice, selections- invert- delete. select none. now delete your original layer (merged 1)
Now i want you to do this with all your merged layers. adding a slight drop shadow on all of
them once you're done. Now reaching "raster 5" should be the long blue rectangle. doing the
same as the merged layers. selections all- float- defloat- copy and paste paper of choice
selections invert- delete. select none. removing (raster 5) original layer. adding a gradient
glow around this paper layer if you'd like.


Now we're reaching the raster 1 this should be the black circle. while it's selected. go to
selections all- float- defloat- copy and paste your tubes close up of choice, selections-
invert- delete. select none. going to Adjust- hue and saturation- colorize both dials set at
zero now lowering the opacity down alittle bit to your liking. adding a slight radiance to
this. not hide ALL of your layers besides the black circle and your new tube layers. You're 
going to now merge your tube and black circle together. now go back and unhide your layers.


Now it's time to add your main tube resize if you need too. i did not, add radiance and a
drop shadow place tube where you want or use my tag as a guide. now it's time for the
elements. i used the beer bottle cap, both of the glasses of beer, menu sign, red and yellow 
ribbons, wooden circle frame, fresh and cold sign, cold beer stamp, so good wordart, and i 
used papers 1, 3, 9, and 10. resize elements down placing them where you want or using my tag
as a guide.

Now add your opyrights, add your name and save as a png and  you’re done!


Thanks for trying my tutorial.
Now lets see those results.


-----------------------
Ptu now Ftu 2/26/2017
This tutorial was written on July 1st, 2013 by Melissa.
In no way may this tutorial be copied to another
website without the creators permission. Any resemblance
to this tutorial is purely coincidental.

Ptu now Ftu - Bad Girls Club


This tutorial was written in PSP 9 and can be used with any other version.
I assume that you have a working knowledge of PSP.


-----------------------


Supplies Needed:
Tubes of choice

Ptu now Ftu scrapkit by Tammy Kat
Bad Girls Club kit HERE

Melissa’s template 36 HERE
font of choice i used QK Marisa

-----------------------

I am using the artwork of Tyson Mcadoo
He no longer sells his artwork in tube form
He still sells prints and such things Here
-----------------------


Open up template & scrap kit pieces resize them first if needed.


Now I took off the doodles, select the back circle, selections all float>defloat> copy paste your paper of choice, I used the “bad girls club” paper, now invert>delete select none. Now delete your template layer, on your paper layer selections all float> defloat> modify> expand by 3, add a new raster layer, flood fill color of choice, I used hot pink, select none, drag this layer below your frame layer, add noise now drop shadow.


Now let’s go to your long rectangles, they are all conected, selections all float> defloat, copy and paste paper of choice, I used the purple paper, invert>delete select none, Now get delete that template layer, select the outside frames of the rectangle, selections all float>defloat copy and paste another paper of choice, I used the bright green paper, now invert>delete select none, I added noise to paper layer. Add drop shadow.


Now select each square selections all float> defloat> copy and paste paper of choice, invert>delete select none, now do this for every square, make sure to delete the template layers as you go, now do the same for your square frames, selections all float> defloat> add a new raster layer flood fill color or paper of choice, I used white select none, delete template layer, I did this for each square, I then selected each paper square again selections all float>defloat> copy paste your tube of choice, invert>delete select none, change blend mode to screen, do this for every square that you placed your tube, now I on your square frames add noise if you’d like, I then added drop shadow, now at this point I would merge everything.


Now place your main tube in front add drop shadow, I used the cute frame element “bad girl” and I copied and pasted it on my tag dragged it below my merged tag, now cut off any access of your tube that you don’t want showing. Now add your other elements of choice add drop shadows.


add your copyright & your name, Now save as a PNG and you're done!


Now lets see those results,
I hope you have enjoyed this tutorial!


-----------------------
Ptu now Ftu 2/26/2017
This tutorial was written on April 18th, 2010 by Melissa.
In no way may this tutorial be copied to another
website without the creators permission. Any resemblance
to this tutorial is purely coincidental.

Ptu now Ftu - Hardcore Gothic Babe


This tutorial was written in PSP 9 and can be used with any other version.
I assume that you have a working knowledge of PSP.


-----------------------


Supplies Needed:
Tube of choice/close up

Ptu now Ftu scrap by TammyKat
 “Hardcore” scrap HERE

Fonts of choice & mask of choice
I used Vix_mask365


Plugins Needed Optional:
Eyecandy 4000- Gradient glow
Photoeffex - scanlines
Xero – Radiance
Xero - Porcelain


----------------------- 
I am using the artwork of Elias Chatzoudis
His tubes are now @ CDO
Tube i used found Here
-----------------------


let’s open up a new canvas 600x600, now let’s open the scrap pieces of choice, I opened up the frame, now resize the frame down to a size you want I used the deform tool to do this so I don’t have any certain settings, duplicate this and drag frame beside your other frame use my tag as a reference, duplicate the same frame now drag is across again and use your deform tool and tilt it to the side alittle bit, to drag stuff I use the mover tool.


Now merge just your frames together, click on the inside selections all> modify> expand by 2, copy and paste paper of choice invert>delete select none. Now drag your paper layer below your frame, do the same with a close up tube place in the larger two frames, and then use the main tube maybe resize it a bit flipping it the opposite side if you’d like on the tilted frame do this my selecting the inside and doing the step you did for the paper, now add your porcelain effect on one tube, change the blend mode to your close up tube.. I used hard light I think, and use the radiance on this layer..


Now give any of these drop shadows, I then resized the main tube down alittle bit place infront of your frames, I then took her “hardcore” wordart and placed it the front, I added a gradient glow of white, then I added noise then drop shadow, this is optional, I then got my text tool out got on a pixel font and typed out “gothic babe” down along the bottom, I placed the wordart and text down by my tube so it would cover up the bottom of it..


Now bring out one of the star frames, resize if needed select the inside with your magic wand, selections> expand by 3, copy and paste paper of choice, invert>delete, select none. Now drag paper layer below frame, do the same but copy and paste your tube this time, colorize this if you want, now add your scanlines plugin, if you don’t have this you can use blinds and tweak with the settings you will get the same exact effect.


Add a drop shadow to that, now let’s open up some elements I opened up a few of those beads, I used pink and purple resized them down a bit and I placed them down the tilted frame, a few times added a drop shadow, and I merged everything


add your copyright, mask & your name, Now save as a PNG and you're done!


Thanks for trying my tutorial.
Now lets see those results,
I hope you have enjoyed this tutorial!


-----------------------
Ptu now Ftu 2/26/2017
This tutorial was written on May 28, 2010 by Melissa.
In no way may this tutorial be copied to another
website without the creators permission. Any resemblance

to this tutorial is purely coincidental.

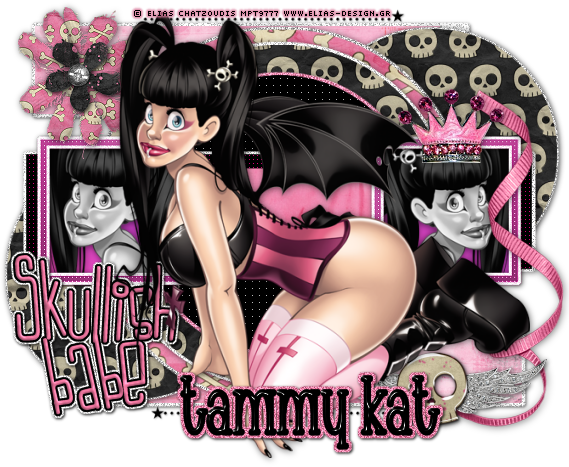
Ptu now Ftu - Skullish Babe


This tutorial was written in PSP 9 and can be used with any other version.
I assume that you have a working knowledge of PSP.


-----------------------
Supplies Needed:
Tubes of choice

Ptu now Ftu Scrapkit by Tammy Kat
Skulls 'n Bones kit HERE
She Re-vamped this scrapkit too

Missy’s template 332 HERE

fonts of choice i used Chachie
LDJ Jilly Nilly


Plugins Needed Optional
Penta.com – color dot


-----------------------
I am using the artwork of Elias Chatzoudis
You can find his artwork @ CDO
Tube i used is Here
-----------------------


Open up template & scrap kit pieces resize them first if needed, resize your template to 80%, remove anything you don’t plan on using. Select the inside of your square frame with your magic wand, selections all modify>expand by 3 copy and paste your tube of choice, invert>delete select none, do the same to the other square, turn black and white.


Select the colored center rectangle, selections all float> defloat> copy and paste paper of choice, invert>delete select none, select the black rectangle selections all float> defloat> modify> expand by 3 add a new raster layer, flood fill color of choice select none, make sure to drag the flood filled layer below your black rectangle layer, add noise now add drop shadow. Go back to the black rectangle get your color dot plugin and use it settings of choice, do the same for your black circle.


Select the black circles glitter layer, selections all float> defloat modify> expand by 3, add a new raster layer flood fill color of choice now select none, drag this layer below the black circle now select none add noise and now add your drop shadow.


Let’s go to the bigger pink circle selections all float> defloat> copy and paste paper of choice, invert>delete select none, behind this layer select it, now selections all float> defloat modify> expand by 3, add a new raster layer flood fill, delect none keep in mind every time you add a new raster layer and flood fill color or paper you need to drag it below so you can see your main layer, add noise and drop shadow, now do the exact same for the last circle and glittered circle layer.


Now go to your purple and pink circle glittered layers, hide all your layers by clicking the “eye” now merge these 2 layers, selections all float> defloat> copy and paste paper of choice, invert>delete select none, now hide that layer, do the same for the back black circles, merge those, selections all float> defloat> modify> expand by 3 now add new raster layer, flood fill color of choice, select none, add noise and drop shadow


Now let’s hide all your layers but your left and right black rectangle merge these not selections all float> defloat> copy and paste paper of choice, invert>delete select none, hide these unhide your white glitter layers add drop shadow, now unhide all your layers


Now for your main tube, place where you’d like it resize if needed, now add drop shadow, resize your elements of choice, place them where you’d like them add drop shadows of choice, now get your text tool out and type out anything you’d like for a simple wordart I used skullish babe add your gradient glow drop shadow.


add your copyright & your name, Now save as a PNG and you're done!


Now lets see those results,
I hope you have enjoyed this tutorial!


-----------------------
Ptu now Ftu 2/26/2017
This tutorial was written on April 19th, 2010 by Melissa.
In no way may this tutorial be copied to another
website without the creators permission. Any resemblance
to this tutorial is purely coincidental.

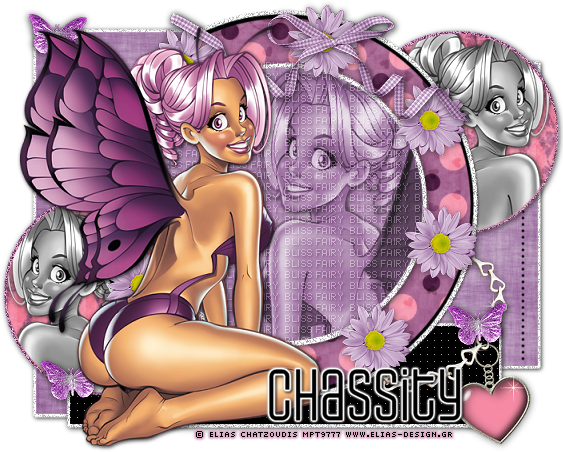
Ptu now Ftu - Fairy Bliss


This tutorial was written in PSP 9 and can be used with any other version.
I assume that you have a working knowledge of PSP.


-----------------------

Supplies Needed:
Tube of choice/close up

Ptu now Ftu scrapkit by Chassity
 Girlie Girl kit HERE
3rd kit down

Missy’s Template 329 HERE

font of choice i used Weltron


Plugins Needed Optional:
MuRa's Meister – Copies
Penta.com – color dots
Xero - porcelain


-----------------------
I am using the artwork of Elias Chatzoudis
You can find his artwork @ CDO
Tube i used is Here


Let’s open your template, I removed the pieces I wasn’t going to use before I got started, which was the wordart, stars, dots, some of the other stuff, you can use my tag as a reference on which to remove, or leave it as is…. Now resize, I resized to about 80%


Now lets open your tubes of choice, resize your tube I resized about 80% also
Place tube where you want it but not in front of the circle we’re going to be needing that clear, I placed mine on the left hand side, now add drop shadow


Now let’s click on the main circle, selections select all>float> defloat copy and paste your paper of choice, invert>delete select none, get rid of the template circle.


Select your paper layer again do the same thing, but copy and paste your close up tube of close, invert>delete select none, make sure your tube layer is above the paper layer now you don’t have too but I changed blend mode to luminance (legacy). Now let’s apply open up xero for that porcelain effect, mess with the settings that best suit you. Now let’s get your text tool background set to white, let’s use a pixel type font size 6 anti-alias off, type out text that you would like I choose “Fairy Bliss” Layers>convert to raster


Not let’s use copies plugin, “preset menu” I used “tiling” I tweaked with the rest of the settings, you may need to too, to get the effect you’d like. Now once you’ve done that go to your paper layer, again selections select all>float > defloat, select invert not go to your layer with the tiled text hit delete selection none. Change blend mode to “soft light” now add drop shadow to make the text pop out more. I used Opacity at 100, blur at 3, vertical & horizontol at 1, color black, click ok.


Let’s drop down to your glittered circle layer, I went to adjust> add noise set mine to like 66% so it would be brighter since I resized it, now go back to adjust>sharpen, add drop shadow of choice, Now let’s move to the pink circle layer, selections select all>float> defloat copy and paste paper of choice I used paper7 invert>delete select none. Close out of your template layer, go back to the other glittered circle layer, and refresh that as well go to adjust>add noise, now back to adjust>sharpen.


Now let’s click on your thin rectangle, get your penta.com color dot plugin, settings of choice apply to your black square, you may change the color or add paper, but I didn’t, now go to the layer below the black rectangle, adjust>add noise 66, adjust>sharpen, now add drop shadow.


Now let’s go to both of your circle layers on each side, hide all your layers, mege these together, unhide your layers, selections all float>defloat copy and paste paper of choice, invert>delete select none, now time to add your tubes of choice if you want, selections all float>defloat, copy and paste your tube of choice, to each circle at once, not click invert> go to each tube layer and hit delete, now select none, turn your tubes black & white


Go back on the paper layers on the 2 circles, selections all float >defloat> modify> expand by 3, add a new raster layer, floor fill color white, select none, drag flood fill layer below your tube & paper layer, to go adjust> add noise 54% drop shadow.


Let’s hide all your layers besides your back rectangle layer with the glittered layer, and “shape2”, select all float>defloat, add a new raster layer, flood fill white, select none, now drag the white layer below, get rid of the pink/white glittered layer that was below it, back to white floor fill, adjust>add noise 54%, now add a drop shadow, now do the same thing with your shape2 layer, now hide your glittered layers, merge your rectangle & shape2 layers, selections all float>defloat copy and paste your paper of choice, invert>delete select none.


Now open your flower element of choice, I used the purple element44, resize down to about 25% copy and paste around the bigger circle duplicate and add them around in a circle, close out of all your layers besides the flowers, merge them now add a drop shadow and unhide all your layers, drag below your tube layer if you placed any above it so it hides below. Now add the rest of elements of choice where you’d like them, add drop shadows now merge all of your layers.


Now add your copyright, name and save as a PNG


Now lets see those results,
I hope you have enjoyed this tutorial!


-----------------------

Ptu now Ftu 2/26/2017
This tutorial was written on April 15th, 2010 by Melissa.
In no way may this tutorial be copied to another
website without the creators permission. Any resemblance
to this tutorial is purely coincidental.