This tutorial was written in PSP 9 and can be used with any other version. I assume that you
have a working knowledge of PSP.
-----------------------
Supplies Needed:
Tube of choice/close up
PTU Scrap kit by Polkadot Scraps
"Genuine Draft" Click Here
"Genuine Draft" Click Here
Fonts of your choice
Plugins Optional:
Xero - radiance
-----------------------
I am using the art of Dominic Marco
You can find his tubes Here
-----------------------
*May be difficult, Working with multiple layers*
Let's open the template resize by 80% now go to image- canvas size set at 600x600. let's take
off a few things. first remove the credits. the game on text and the circles the text appears
on. Hide all of your layers but the last two black rectangles and merge these and rename them
"merged 1" hide this and unhide the next two layers, which should be two purple squares.
merge these together rename this "merged 2" hide this layer. unhide the next two pink
rectangles. merge once again and rename "merged 3" now unhide all of your layers.
You should have 3 merged layers. raster 5 layer and copy of raster 1. hide raster 5 and 1.
While merged 1 is selected, go to selections all- float- defloat copy and paste paper of
choice, selections- invert- delete. select none. now delete your original layer (merged 1)
Now i want you to do this with all your merged layers. adding a slight drop shadow on all of
them once you're done. Now reaching "raster 5" should be the long blue rectangle. doing the
same as the merged layers. selections all- float- defloat- copy and paste paper of choice
selections invert- delete. select none. removing (raster 5) original layer. adding a gradient
glow around this paper layer if you'd like.
Now we're reaching the raster 1 this should be the black circle. while it's selected. go to
selections all- float- defloat- copy and paste your tubes close up of choice, selections-
invert- delete. select none. going to Adjust- hue and saturation- colorize both dials set at
zero now lowering the opacity down alittle bit to your liking. adding a slight radiance to
this. not hide ALL of your layers besides the black circle and your new tube layers. You're
going to now merge your tube and black circle together. now go back and unhide your layers.
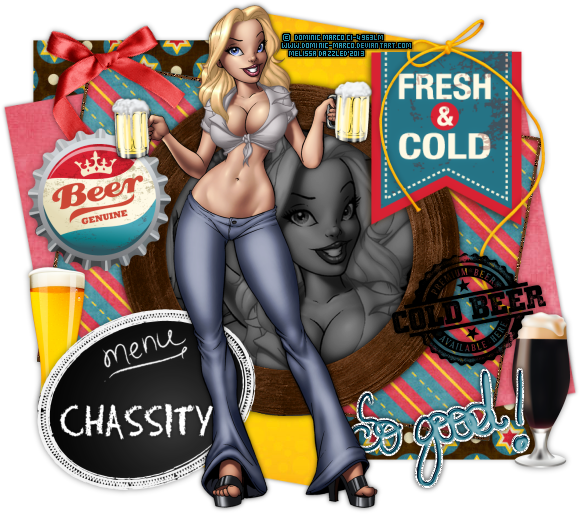
Now it's time to add your main tube resize if you need too. i did not, add radiance and a
drop shadow place tube where you want or use my tag as a guide. now it's time for the
elements. i used the beer bottle cap, both of the glasses of beer, menu sign, red and yellow
ribbons, wooden circle frame, fresh and cold sign, cold beer stamp, so good wordart, and i
used papers 1, 3, 9, and 10. resize elements down placing them where you want or using my tag
as a guide.
Now add your opyrights, add your name and save as a png and you’re done!
Thanks for trying my tutorial.
Now lets see those results.
-----------------------
This tutorial was written on July 1st, 2013 by Melissa.
In no way may this tutorial be copied to another
website without the creators permission. Any resemblance
to this tutorial is purely coincidental.
In no way may this tutorial be copied to another
website without the creators permission. Any resemblance
to this tutorial is purely coincidental.


No comments:
Post a Comment