

This tutorial was written in PSP 9 and can be used with any other version. I assume that you have a working knowledge of PSP.
-----------------------
Supplies Needed:
Tube of choice/close up
PTU Scrap kit by Irish Princess Designs
"Bunny" Purchase at Smiley Creations
Font of choice
Annabelle JF
PSP sparkle tube that
came with psp9
Mask 1242 by
-----------------------
Supplies Needed:
Tube of choice/close up
PTU Scrap kit by Irish Princess Designs
"Bunny" Purchase at Smiley Creations
Font of choice
Annabelle JF
PSP sparkle tube that
came with psp9
Mask 1242 by
Cybia - screenworks- Hollow dot
xero - radiance
Tutorial shortcut index:
"Delete" on your keyboard under Insert.
"C/P" copy and paste as new layer.
Remove "O/L" Remove original layer.
"D/S" Drop shadow located in 3D effects.
"R/S" Resize layer located in Image.
New "R/L" Raster layer, in Layers.
"outer glow" Gradient glow from eye candy
Or my method on my blog under "How to dos"
Good D/S settings:
0, 0, 57, 6, color black
Good add noise settings:
Uniform- 70-90 % noise monochrome
Random- 10-34% noise monochrome
-----------------------
I used the artwork of Keith Garvey
You can find his artwork Here
-----------------------
Open a 600x600 canvas
Open flowers R/S to 25% C/P onto canvas
MuRa's Meister - copies settings using the settings below
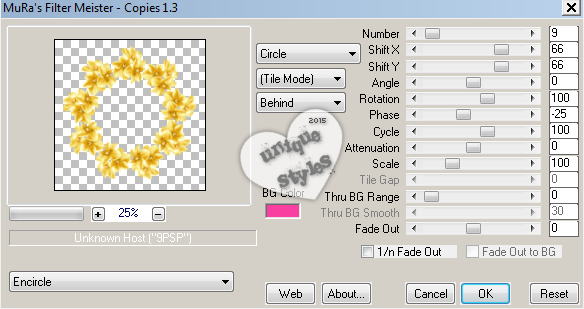
Now open the flowers1 R/S to 25% C/P onto canvas, using this
xero - radiance
Tutorial shortcut index:
"Delete" on your keyboard under Insert.
"C/P" copy and paste as new layer.
Remove "O/L" Remove original layer.
"D/S" Drop shadow located in 3D effects.
"R/S" Resize layer located in Image.
New "R/L" Raster layer, in Layers.
"outer glow" Gradient glow from eye candy
Or my method on my blog under "How to dos"
Good D/S settings:
0, 0, 57, 6, color black
Good add noise settings:
Uniform- 70-90 % noise monochrome
Random- 10-34% noise monochrome
-----------------------
I used the artwork of Keith Garvey
You can find his artwork Here
-----------------------
Open a 600x600 canvas
Open flowers R/S to 25% C/P onto canvas
MuRa's Meister - copies settings using the settings below
Now open the flowers1 R/S to 25% C/P onto canvas, using this

Add D/S then merge them both together, Using magic wand click
inside of your frame. selections-modify- expand by22, open paper3
R/S to 50%, Adjust- brightness/constrast B -40, C 30. C/P onto your canvas
selections- invert. delete, select none. drag below frame
Select your paper layer, selections- all- float- defloat. Open close up of choice
C/P onto canvas, selections- invert, delete. select none.
Set blend mode to overlay, then i turned the tube in greyscale
Then i added a slight radiance, settings of choice.
Duplicate your tube layer, cybia- screen works, Hollow dot mode 70
I then change the blend mode again to softlight
Open tube of choice, R/S, if you use the same tube as me i resized down to 92%
put off to the side, add outer glow, then D/S
Now it's element time
Elements i used and the resized %
Using this drop shadow: 0, 0, 30, 8, color black
Grass - 40%
Branch - 50%
Bird - 15%
Birdhouse (pink branch)60%
Rabbit - 30%
Pedals - 25%
Vase - 30%
Cupcake - 25%
Latern - 20%
Dandelion - 15%
Butterfly - 15%
Sparkles1 - 60%
place elements where you want, or use my tag as a guide.
I then used the sparkle PSP tube placed my own sparkles where i wanted
After i merged my tag i added red paw media beautifier settings below

Mask: i used paper4, R/S to 60% an changed brightness
Apply your mask- add copyrights, your name save as a PNG
You're done!


Thanks for trying my tutorial.
Now lets see those results.
----------------------
This tutorial was written on March 24th, 2015 by Melissa.
In no way may this tutorial be copied to another
website without the creators permission. Any resemblance
to this tutorial is purely coincidental.
Now lets see those results.
----------------------
This tutorial was written on March 24th, 2015 by Melissa.
In no way may this tutorial be copied to another
website without the creators permission. Any resemblance
to this tutorial is purely coincidental.
No comments:
Post a Comment