

This tutorial was written in PSP 9 and can be used with any other version. I assume that you have a working knowledge of PSP.
-----------------------
Supplies Needed:
Tube of choice/close up
Free Scrap kit by Gimptastic Scraps
"Living on the Edge" Grab this Here
Font of choice
AnneBoleynSH
Mask of choice
Plugins Optional:
none
Tutorial shortcut index:
"Delete" on your keyboard under Insert.
"C/P" copy and paste as new layer.
Remove "O/L" Remove original layer.
"D/S" Drop shadow located in 3D effects.
"R/S" Resize layer located in Image.
New "R/L" Raster layer, in Layers.
"outer glow" Gradient glow from eye candy
Or my method on my blog under "How to dos"
Good D/S settings:
0, 0, 57, 6, color black
Good add noise settings:
Uniform- 70-90 % noise monochrome
Random- 10-34% noise monochrome
-----------------------
I used the artwork of Ismael Rac
You can find his artwork Here
-----------------------
Open frame1 image- rotate clockwise 90 R/S to 80%, Image- canvas size 600x600
Open frame2 R/S to 80% C/P onto canvas drag below the other frame,
erasing off anything showing
Using your selection tool drag out a section in the middle of your canvas
using the middle parts of the frame2. open paper1 C/P onto your
your canvas, selections- invert- delete select none
drag below your frames layers. should look something like below

Now using your selection tool again draw out rectangles on either side
open paper8 C/P onto canvas, selections- invert. delete, select none
drag this below your frames layers too, it should look like this
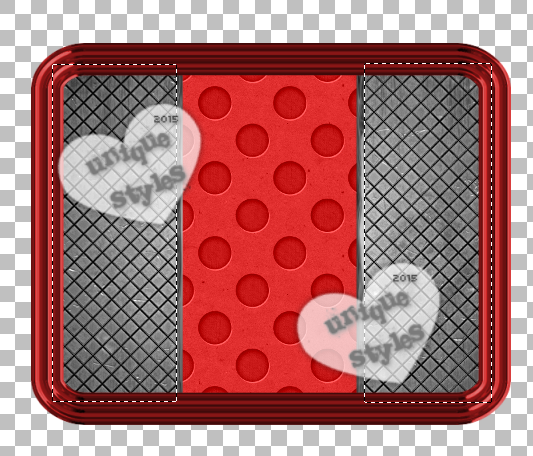
Image- rotate- rotate counterclockwise, I decided to rotate it back lol
Open tube of choice R/S, add outer glow, add noise then apply drop shadow
Now it's element time
Elements i used and the resized %
Using this drop shadow: 0, 0, 44, 9, color black
Wordart - 80%
SkullNRose - 50%
Bottle - 80%
Skull - 60%
Cuffs - 40%
Boot - 60%
Glasses - 30%
place elements where you want, or use my tag as a guide.
Add your copyrights, mask (paper3 colorized red)
your name save as a PNG
You're done!
Thanks for trying my tutorial.
Now lets see those results.
----------------------
This tutorial was written on April 29th, 2015 by Melissa.
In no way may this tutorial be copied to another
website without the creators permission. Any resemblance
to this tutorial is purely coincidental.
This is fab!!!!!!! Thanks for sharing :)
ReplyDelete