This tutorial was written for those
that have a working knowledge of PSP.
Supplies Needed:
PSP 9 (any version will work)
Tube of choice
I used artwork by Elias Chatzoudis
If you would like to use his artwork please visit MPT
I used Scrap kit by Nora "My Love" HERE
Template6 by Vassia HERE
Font of choice - I used Lemonheads
Plugin(s) optional Eye Candy 5 Impact - Extrude
Xero - Radiance
Xero- Porcelain
Mask by Weescotslass HERE
Lets begin
Open up the template.
Go to image> canvas Size> width/height - 600 will Resize later.
Open your choice of papers, elements, tube(s) that you want.
Click on the rounded rectangle> selections> select all> float> defloat
Open up paper of choice, paste onto canvas> selections> invert,
hit delete selections> none,
delete original layer so it's only the paper.
Select the dotted layer> selections> select all> float> defloat
add new raster flood fill w/white, selections> invert hit delete
add bevel to make the dots stand out if you like
selections> none, delete original layer.
Select the inside of the frame> selections> select all> float> defloat
add new raster flood fill w/black selections> invert, hit delete
selections> none, delete original layer now open up your tube
place head in middle of frame slide it below your frame layer, cut
off the access of tube, add a drop down to the frame layer.
Select tube layer, go to adjust>hue & saturation> colorize
make sure both are at 0, this will make your tube black and white,
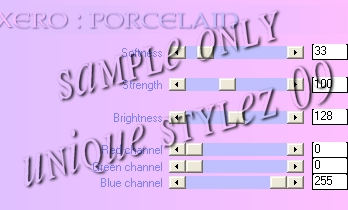
open plugin, xero - porcelain, i used these settings

Now click outside of the frame selections> select all> float>
defloat add new raster, flood fill w/white, selections> invert, hit delete
select the top circle selections> select all> float> defloat open up
paper of choice, paste on canvas selections> invert hit delete
select none now do the same for the bottom circle.
Add your tube of choice, resize if needed, open your plugin
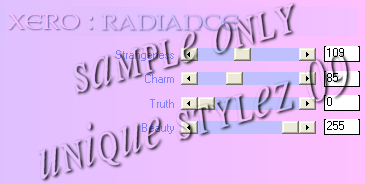
xero - radiance using these settings, then add a drop down shadow

Now give every layer a drop down shadow, v&h - 1 opacity
70 blur - 7 now add your elements of choice, resize & add drop down
select the wordart cutie, add a new raster flood fill with a color
or selections> select all> float> defloat and use a paper of choice
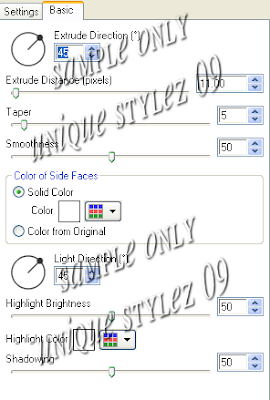
open your plugin eyecandy 5 impact - extrude, use these settings
remember on the "soild color" part choose a color of choice

now add raster layer, flood fill white, drag layer all the way
at the bottom, now do it again add raster, now flood fill with your
color or choose a paper of choice, then add your mask
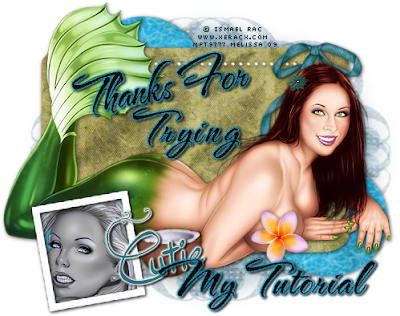
Add your copyright & your name, save as a png and your done!

I hope you have enjoyed it.
I would love to see what you make,
feel free to email at unique_stylez09@yahoo.com
This Tutorial was written 1/21/09.
And the concept of the tutorial is copyrighted.
Do not copy it in any way, pass out or re-write without permission.
The image you create using this tutorial is for you to do what you wish
except for monetary gains or for merchandising.
Any Resemblance to another tutorial is purely coincidental.

No comments:
Post a Comment