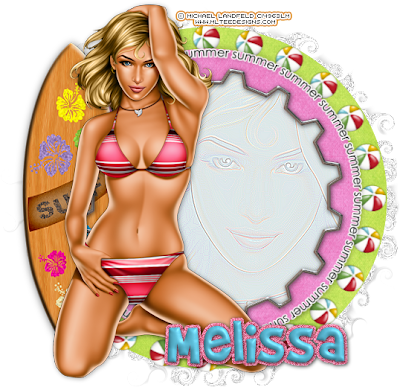
~tut under construction~
This tutorial was written in PSP 9 and can be used with any other version. I assume that you have a working knowledge of PSP.
-----------------------
Supplies Needed:
Tube of choice/close up
Scrap kit by Jaelop Designs
http://jaelop.blogspot.com/
My template is no longer available, You'll need
font of choice i used Brady Bunch
Plugins Needed Optional:
MuRa's Meister - Copies
eye candy 4000 - chrome
PSP Effects needed:
art media effects - pencil
distortion effects - curlicues
-----------------------
I am using the artwork of Michael Landfeld
You buy his tubes here CILM
-----------------------
Open up scrap kit pieces resize them first if needed
let's go to the bigger circle select all> float> defloat
copy and paste your paper of choice and select
invert> delete select none, now select
delete template layer add drop shadow on to the paper layer
Do this for the second small circle also delete template layer,
add drop shadow on paper layer, and now the middle gear click on the inside selections> modify> expand by 2 copy & paste your paper of choice and select invert>delete now select none, drag your paper layer below the gear outline Now i added a "chrome" effect with the plugin eye candy 4000 this is optional
repeat this for the gear again click on the inside selections> modify> expand by 2 copy & paste your close up tube of choice, select invert> delete now select none
on your tube layer go to effects> art media effects - pencil settings i used was this, Luminace - 203, blur - 3, intensity - 22, i used color of the paper i picked now go to adjust> sharpen a few times to get a better looking effect (optional)
copy & paste your main tube where you want it, resize surf board
and place behind the tube, give tube & board drop shadow
grab your beach ball resize to a small size, go to mura's miester-copies settings may vary so fit a setting that suits you but i had it on encircle and plays with the settings, now add drop shadow, and place where you'd like the ball of circles at
now on the very back circle layer the white one go to effects> distortion effects - curlicues, settings i used was number of columns - 16, number of rows - 16, radius- 100% strength - 50 symmetric & clock wise checked, click "ok" now apply again for best effect
Now add the scrap kit circle word art if you'd lize resize & drop shadow, or use your own
add your copyright & your name, Now save as a PNG and you're done!
Thanks for trying my tutorial.
Now lets see those results,
I hope you have enjoyed this tutorial!
-----------------------
This tutorial was written on April 7th, 2010 by Melissa.
In no way may this tutorial be copied to another
website without the creators permission. Any resemblance
to this tutorial is purely coincidental.

No comments:
Post a Comment